Getting Started with Mit App Inventor

Tutorial plan
1- Presentation of Mit App Inventor
2- Description of Designer Interface of Mit App Inventor
3- Description of Blocks part of Mit App Inventor
Presentation of Mit App Inventor
MIT App Inventor is a free, open-source, cloud-based platform developed by the Massachusetts Institute of Technology (MIT).
It allows users even those with no prior programming experience to create fully functional Android applications through a visual programming interface.
Instead of writing code, users build apps by dragging and connecting programming blocks, similar to puzzle pieces. This makes it intuitive, beginner-friendly, and ideal for learning fundamental programming concepts.
1. Designer Interface
Used to build the visual layout of the app.
Add components like:
Buttons
TextBoxes
Labels
Images
Sensors (GPS, accelerometer, etc.)
Media (camera, audio, video)
Connectivity tools (Bluetooth, web, email)
Components are arranged visually like designing a screen.
2. Blocks Editor
Used to program the logic of the app.
Code is built using drag-and-drop blocks, inspired by Scratch.
Blocks include:
Events (when button clicked)
Control structures (if-else, loops)
Variables
Procedures (custom functions)
Math and logic operations
Makes programming easy to understand, especially for beginners.
3. How App Inventor Works ?
Design the interface using the Designer tab.
Program the behavior using the Blocks tab.
Test your app live on an Android device using the MIT AI2 Companion app.
Package your app as an .apk file to install or distribute.
Optionally, export your app to the Google Play Store.
MIT App Inventor is a powerful yet accessible tool that transforms how beginners learn to build apps and understand coding. It lowers the entry barrier for programming and enables users to create real, useful mobile applications from their ideas — all without writing a single line of traditional code.
Description of Designer Interface of Mit App Inventor
The Designer interface is one of the two main parts of MIT App Inventor (the other being the Blocks Editor). It is the area where you visually design your app’s user interface (UI) — similar to drawing the layout of a mobile app screen.
To create and organize the visual elements of your app — such as buttons, text fields, images, and labels — by dragging them onto a virtual phone screen.
Main Sections of the Designer Interface:

1. Palette
Located on the left-hand side.
Contains categories of components, such as:
User Interface: Buttons, Labels, TextBoxes, etc.
Layout: Horizontal/Vertical Arrangements
Media: Camera, Sound, Player
Sensors: Accelerometer, Location Sensor
Connectivity: Bluetooth, Web, ActivityStarter
You can drag components from the palette to the Viewer.
2. Viewer
The central area of the Designer screen.
Displays a virtual phone screen where you place and arrange components.
You can see what the app will look like on a real device.
3. Components List
Located on the right side, below the viewer.
Shows a hierarchical list of all components used in the app.
Allows you to select and rename components.
Helps you organize elements (especially if there are many).
4. Properties Panel
Appears on the far right when a component is selected.
Lets you customize the selected component.
You can set:
Text (e.g., button label)
Font size and color
Image files
Background color
Visibility, alignment, etc.
5. Media Section
Found below the Components list.
Stores images, sounds, and other media files uploaded for the app.
Description of Blocks part of Mit App Inventor
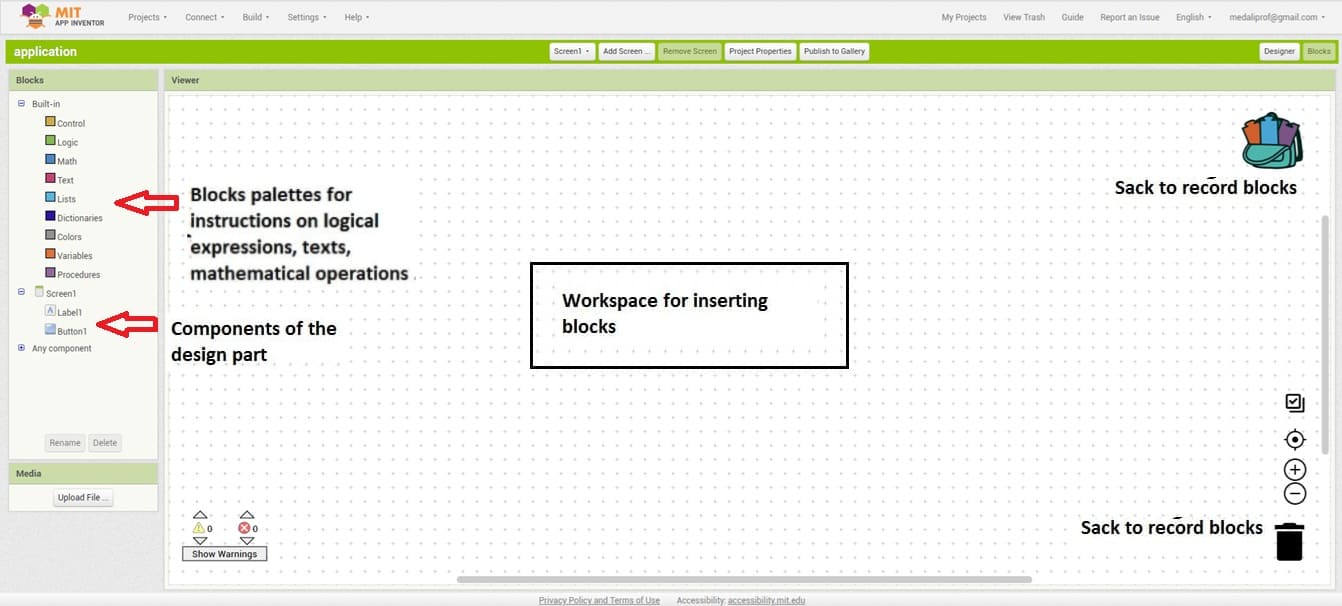
The Blocks section of MIT App Inventor is where you program your app's behavior using visual programming blocks (similar to puzzle pieces). These blocks control how components behave, respond to events, and interact with each other. Here's a detailed description:
1. What Is the Blocks Section?
The Blocks Editor is one of the two main parts of MIT App Inventor (along with the Designer). It provides a graphical interface for coding your app using drag-and-drop logic blocks instead of typing code.
2. Types of Blocks
MIT App Inventor has several categories of blocks:
a. Built-in Blocks
These are blocks that provide basic logic and functions:
Control: For flow of the program (e.g., if, if-else, while, for each, when, etc.)
Logic: Boolean operations like true, false, not, and, or.
Math: Arithmetic operations such as +, -, *, /, random numbers, etc.
Text: For creating and manipulating text.
Lists: For creating and managing lists.
Colors: For selecting and manipulating colors.
Variables: For creating and using variables.
Procedures: To create reusable custom blocks (like functions).
b. Component-Specific Blocks
These are blocks that correspond to the components you’ve added in the Designer (e.g., Button, Label, Image, Canvas, Web, etc.).
Each component usually includes:
Event blocks (e.g., when Button1.Click)
Property blocks (e.g., set Label1.Text to)
Method blocks (e.g., call Sound1.Play)
3. How the Blocks Work
Fit like puzzle pieces: Blocks are shaped to fit only where they make sense, helping avoid syntax errors.
Color-coded: Each type of block has a unique color, making it easy to identify:
Control = Yellow
Logic = Light Green
Math = Blue
Text = Pink
Components = Dark Blue or Light Blue
Event-driven: You often start with blocks like when Button1.Click do, then define what happens.
0 comment
Leave a comment
Passion for robotics

Recent tutorials


Robotics workshop

Polpular tutorials


Making robots

Most commented tutorials


Robotic arm

Categories
Smart Home