How to display data on a TM1637 4-Digit display with ESP8266 NodeMCU
Tutorial plan
1- Objective of the tutorial
2- Introducing the TM1637 4-Digit Display
3- The necessary components
4- ESP8266 Assembly with TM1637 4-Digit Display
5- Program ESP8266 NodeMCU with MicroPython
Objective of the tutorial
The objective of this tutorial is to teach you how to interface a TM1637 4-digit 7-segment display with an ESP8266 NodeMCU and display numerical data such as counters, timers, sensor readings, or any custom values.
You will learn how to:
- connect the TM1637 module to the ESP8266 using only two pins (DIO and CLK).
- install and use a MicroPython or Arduino library to control the display.
- send numbers, characters, and formatted data to the 4-digit display.
- create simple display animations such as counting, updating digits, or blinking.
At the end of the tutorial, you will be able to integrate the TM1637 display into your own IoT projects, microcontroller dashboards, timers, clocks, and sensor monitoring systems.
Introducing the TM1637 4-Digit Display
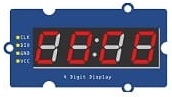
The TM1637 4-digit 7-segment display is a compact and inexpensive module commonly used to show numerical information such as counters, clocks, timers, or sensor values.
It integrates four 7-segment digits and is driven by the TM1637 controller chip, which simplifies communication with microcontrollers like the ESP8266, ESP32, or Arduino.
Unlike traditional 7-segment displays that require many GPIO pins, the TM1637 module communicates through a simple 2-wire serial interface (CLK and DIO). This makes it ideal for projects where GPIO pins are limited.
The necessary components
1. ESP8266 NodeMCU Board
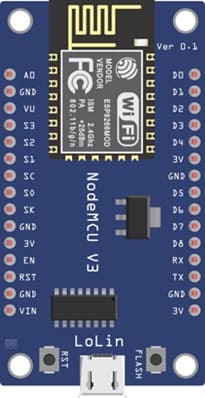
A Wi-Fi–enabled microcontroller that will run the program and send data to the TM1637 display.
2. TM1637 4-Digit 7-Segment Display Module
The display used to show numbers such as counters, timers, or sensor values.
It includes the TM1637 driver chip for easy communication.
3. Jumper Wires

Used to connect the CLK, DIO, VCC, and GND pins between the NodeMCU and the display module.
4. Breadboard (optional)
Useful for making clean and stable connections during prototyping.
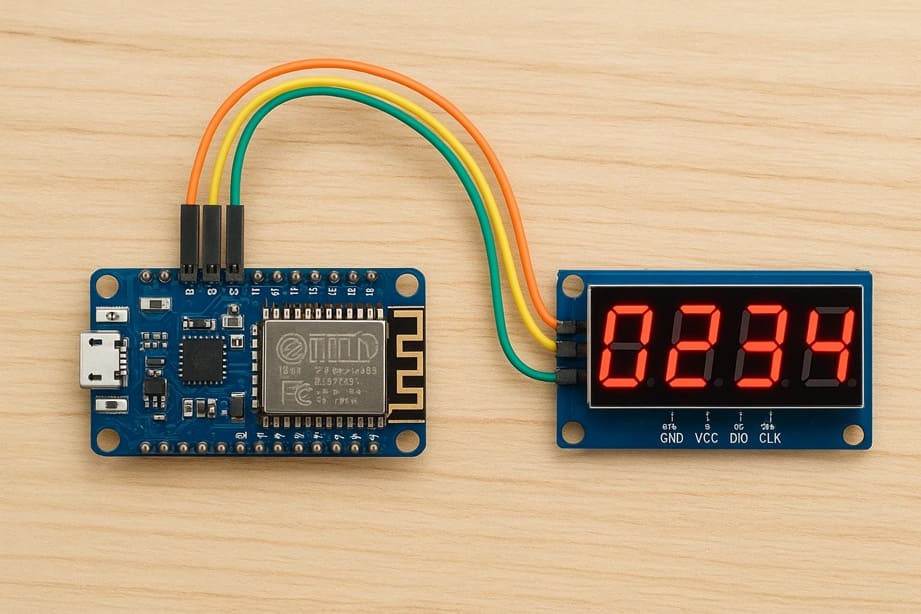
ESP8266 Assembly with TM1637 4-Digit Display
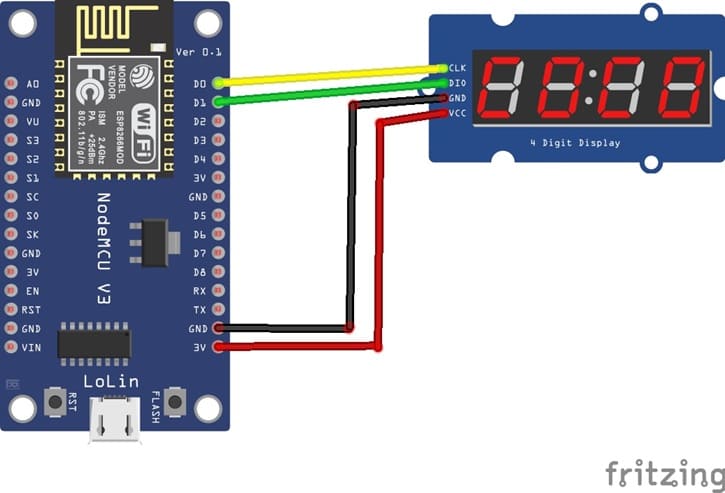
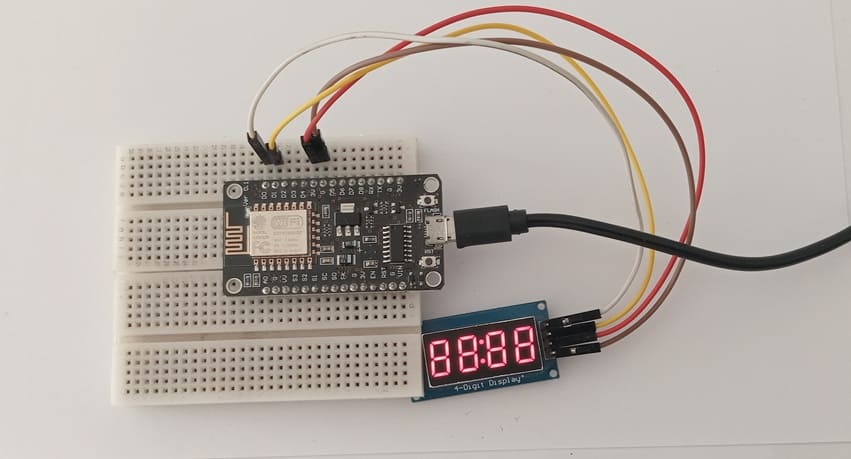
1- Connect the GND pin of the display to the GND pin of the ESP8266 board
2- Connect the VCC pin of the display to the 3V pin of the ESP8266 board
3- Connect the CLK pin of the display to the D0 (GPIO16) pin of the ESP8266 board
4- Connect the DIO pin of the display to the D1 (GPIO5) pin of the ESP8266 board
Program ESP8266 NodeMCU with MicroPython
The role of this program is to demonstrate all the features and capabilities of the TM1637 4-digit display using the MicroPython tm1637 library on an ESP8266 board.
It acts as a complete test and showcase script that displays numbers, characters, symbols, animations, and brightness levels on the TM1637 module.
Make sure you have the MicroPython library tm1637.py installed on your ESP8266.
|
1 2 3 4 5 6 7 8 9 10 11 12 13 14 15 16 17 18 19 20 21 22 23 24 25 26 27 28 29 30 31 32 33 34 35 36 37 38 39 40 41 42 43 44 45 46 47 48 49 50 51 52 53 54 55 56 57 58 59 60 61 62 63 64 65 66 67 68 69 70 71 72 73 74 75 76 77 78 79 80 81 82 83 84 85 86 87 88 89 90 91 92 93 94 95 96 97 98 99 100 101 102 103 104 105 106 107 108 109 110 111 112 113 114 115 116 117 118 119 120 121 122 123 124 125 126 127 128 129 130 131 132 133 134 135 136 137 138 139 140 141 142 143 144 145 146 147 148 149 150 151 152 153 154 155 156 157 158 159 160 161 162 163 164 165 166 167 168 169 170 171 172 173 174 175 176 177 178 179 180 181 182 183 184 185 186 187 188 189 190 191 192 193 194 195 196 197 198 199 200 201 202 203 204 205 206 207 208 209 210 211 212 213 214 215 216 217 218 219 220 221 222 223 224 225 226 227 228 229 230 231 232 233 234 235 236 237 238 239 240 241 |
import tm1637 from machine import Pin import time tm = tm1637.TM1637(clk=Pin(16), dio=Pin(5)) # all LEDS on "88:88" tm.write([127, 255, 127, 127]) tm.write(bytearray([127, 255, 127, 127])) tm.write(b'\x7F\xFF\x7F\x7F') tm.show('8888', True) tm.numbers(88, 88, True) time.sleep(1) # all LEDS off tm.write([0, 0, 0, 0]) time.sleep(1) tm.show(' ') time.sleep(1) # write to the 2nd and 3rd segments only tm.write([119, 124], 1) # _Ab_ time.sleep(1) tm.write([124], 2) # __b_ time.sleep(1) tm.write([119], 1) # _A__ time.sleep(1) # display "0123" tm.write([63, 6, 91, 79]) time.sleep(1) tm.write(bytearray([63, 6, 91, 79])) time.sleep(1) tm.write(b'\x3F\x06\x5B\x4F') time.sleep(1) tm.show('1234') time.sleep(1) tm.number(1234) time.sleep(1) tm.numbers(12, 34, False) time.sleep(1) # display "4567" tm.write([102, 109, 125, 7]) time.sleep(1) tm.write([102], 0) # 4___ time.sleep(1) tm.write([109], 1) # _5__ time.sleep(1) tm.write([125], 2) # __6_ time.sleep(1) tm.write([7], 3) # ___7 time.sleep(1) # set middle two segments to "12", ie "4127" tm.write([6, 91], 1) # _12_ time.sleep(1) # set last segment to "9", ie "4129" tm.write([111], 3) # ___9 time.sleep(1) # show "AbCd" tm.write([119, 124, 57, 94]) time.sleep(1) tm.show('abcd') time.sleep(1) # show "COOL" tm.write([0b00111001, 0b00111111, 0b00111111, 0b00111000]) time.sleep(1) tm.write([0x39, 0x3F, 0x3F, 0x38]) time.sleep(1) tm.write(b'\x39\x3F\x3F\x38') time.sleep(1) tm.write([57, 63, 63, 56]) time.sleep(1) tm.show('cool') time.sleep(1) tm.show('COOL') time.sleep(1) # display "dEAd", "bEEF" tm.hex(0xdead) time.sleep(1) tm.hex(0xbeef) time.sleep(1) tm.show('dead') time.sleep(1) tm.show('Beef') time.sleep(1) # show "12:59" tm.numbers(12, 59) time.sleep(1) tm.show('1259', True) time.sleep(1) # show "-123" tm.number(-123) time.sleep(1) tm.show('-123') time.sleep(1) # Show Help tm.show('Help') time.sleep(1) tm.write(tm.encode_string('Help')) time.sleep(1) tm.write([tm.encode_char('H'), tm.encode_char('e'), tm.encode_char('l'), tm.encode_char('p')]) time.sleep(1) # Scroll Hello World from right to left tm.scroll('Hello World') # 4 fps tm.scroll('Hello World', 1000) # 1 fps # Scroll all available characters tm.scroll(list(tm1637._SEGMENTS)) # all LEDs dim tm.brightness(0) time.sleep(1) # all LEDs bright tm.brightness(7) time.sleep(1) # converts a digit 0-0x0f to a byte representing a single segment # use write() to render the byte on a single segment tm.encode_digit(0) # 63 time.sleep(1) tm.encode_digit(8) time.sleep(1) # 127 tm.encode_digit(0x0f) # 113 time.sleep(1) # 15 or 0x0f generates a segment that can output a F character tm.encode_digit(15) # 113 time.sleep(1) tm.encode_digit(0x0f) # 113 time.sleep(1) # used to convert a 1-4 length string to an array of segments tm.encode_string(' 1') # bytearray(b'\x00\x00\x00\x06') time.sleep(1) tm.encode_string('2 ') # bytearray(b'[\x00\x00\x00') time.sleep(1) tm.encode_string('1234') # bytearray(b'\x06[Of') time.sleep(1) tm.encode_string('-12-') # bytearray(b'@\x06[@') time.sleep(1) tm.encode_string('cafe') # bytearray(b'9wqy') time.sleep(1) tm.encode_string('CAFE') # bytearray(b'9wqy') time.sleep(1) tm.encode_string('a') # bytearray(b'w\x00\x00\x00') time.sleep(1) tm.encode_string('ab') # bytearray(b'w|\x00\x00') time.sleep(1) # used to convert a single character to a segment byte tm.encode_char('1') # 6 time.sleep(1) tm.encode_char('9') # 111 time.sleep(1) tm.encode_char('-') # 64 time.sleep(1) tm.encode_char('a') # 119 time.sleep(1) tm.encode_char('F') # 113 time.sleep(1) # display "dEAd", "bEEF", "CAFE" and "bAbE" tm.hex(0xdead) time.sleep(1) tm.hex(0xbeef) time.sleep(1) tm.hex(0xcafe) time.sleep(1) tm.hex(0xbabe) time.sleep(1) # show "00FF" (hex right aligned) tm.hex(0xff) time.sleep(1) # show " 1" (numbers right aligned) tm.number(1) time.sleep(1) # show " 12" tm.number(12) time.sleep(1) # show " 123" tm.number(123) time.sleep(1) # show "9999" capped at 9999 tm.number(20000) time.sleep(1) # show " -1" tm.number(-1) time.sleep(1) # show " -12" tm.number(-12) time.sleep(1) # show "-123" tm.number(-123) time.sleep(1) # show "-999" capped at -999 tm.number(-1234) time.sleep(1) # show "01:02" tm.numbers(1, 2) time.sleep(1) # show "0102" tm.numbers(1, 2, False) time.sleep(1) # show "-5:11" tm.numbers(-5, 11) time.sleep(1) # show "12:59" tm.numbers(12, 59) time.sleep(1) # show temperature '24*C' tm.temperature(24) tm.show('24*C') time.sleep(1) # show temperature works for range -9 to +99 tm.temperature(-10) # LO*C time.sleep(1) tm.temperature(-9) # -9*C time.sleep(1) tm.temperature(5) # 5*C time.sleep(1) tm.temperature(99) # 99*C time.sleep(1) tm.temperature(100) # HI*C time.sleep(1) |
0 comment
Leave a comment
Passion for robotics

Recent tutorials


Robotics workshop

Polpular tutorials


Making robots

Most commented tutorials


Robotic arm

Categories
Smart Home