Build a Calculator with Arduino UNO
Tutorial plan
1- Objective of the project
2- Required Components
3- Circuit Connections of system
4- Program of Arduino calculator
Objective of the project
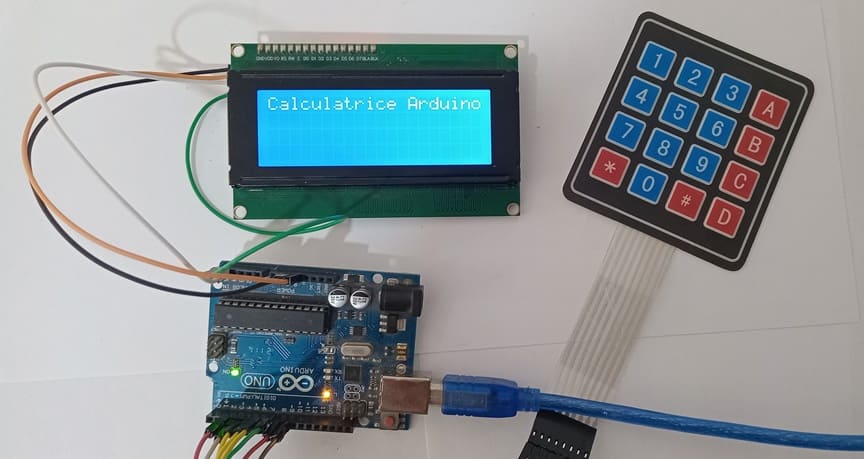
The objective of this project is to design and build an electronic calculator using the Arduino UNO board, a 4×4 matrix keypad, and an LCD I2C screen.
This calculator allows the user to enter numbers and select mathematical operations using the keypad, while the LCD screen displays the entered data and the calculation results in real time.
This project helps learners understand how to interface input devices (keypad) and output devices (LCD display) with a microcontroller. It also introduces fundamental programming concepts such as data input, processing, and output.
By completing this project, students will gain practical experience in electronics, embedded systems, and Arduino programming, and will learn how to create a functional and interactive embedded application.
Required Components
1. Arduino UNO

The Arduino UNO is the main controller of the system. It executes the program written in Arduino language, reads the keys pressed on the keypad, performs the mathematical calculations, and sends the results to the LCD screen. It also provides power and communication to the connected components.
2. 4x4 Matrix Keypad
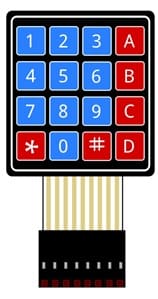
The 4×4 matrix keypad is an input device that allows the user to enter numbers (0–9) and mathematical operators (+, −, ×, ÷, =, C). It consists of 16 buttons arranged in rows and columns. The Arduino scans these rows and columns to detect which key is pressed.
4. LCD Display with I2C Module

The LCD I2C display is used to show: entered numbers, mathematical operations and calculation results.
5. Breadboard

A breadboard can be used to make connections easier without soldering. It helps organize the circuit and allows quick modifications.
6. Jumper Wires

Jumper wires are used to connect the keypad and LCD screen to the Arduino board. They ensure proper electrical connections between all components.
Circuit Connections of system
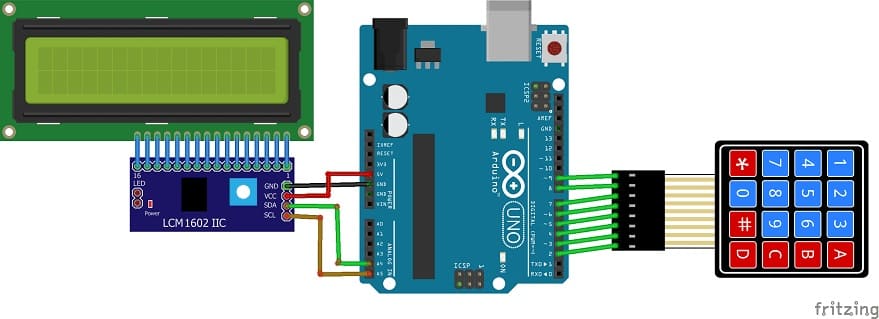
1- Connection of keypad to Arduino UNO
| 4x4 Keypad | Arduino UNO |
|---|---|
| R1 | pin 2 |
| R2 | pin 3 |
| R3 | pin 4 |
| R4 | pin 5 |
| C1 | pin 6 |
| C2 | pin 7 |
| C3 | pin 8 |
| C4 | pin 9 |
2- Connection of LCD I2C display to Arduino UNO
| LCD I2C display | Arduino UNO |
|---|---|
| VCC | 5V |
| GND | GND |
| SDA | pin A4 |
| SCL | pin A5 |
Program of Arduino calculator
This program transforms the Arduino UNO into a functional calculator using a 4x4 matrix keypad for input and an I2C LCD display for output.
You need to install this libraries : LiquidCrystal_I2C and Keypad.
|
1 2 3 4 5 6 7 8 9 10 11 12 13 14 15 16 17 18 19 20 21 22 23 24 25 26 27 28 29 30 31 32 33 34 35 36 37 38 39 40 41 42 43 44 45 46 47 48 49 50 51 52 53 54 55 56 57 58 59 60 61 62 63 64 65 66 67 68 69 70 71 72 73 74 75 76 77 78 79 80 81 82 83 84 85 86 87 88 89 90 91 92 93 94 95 96 97 98 99 100 101 102 103 104 105 106 107 108 109 110 111 112 113 114 115 116 117 118 119 120 121 122 123 124 125 126 127 128 129 130 131 132 133 134 135 136 137 138 139 140 141 142 143 144 145 146 147 148 149 150 151 152 153 154 155 156 157 158 159 160 161 162 163 164 165 166 167 168 169 170 171 172 173 174 175 176 177 |
#include <Wire.h> // Library for I2C communication #include <LiquidCrystal_I2C.h> // Library to control the I2C LCD display #include <Keypad.h> // Library to manage the matrix keypad // ---------------- LCD ---------------- // Create an LCD object with I2C address 0x27, 20 columns and 4 rows LiquidCrystal_I2C lcd(0x27, 20, 4); // ---------------- Keypad ---------------- // Define number of rows and columns of the keypad const byte ROWS = 4; const byte COLS = 4; // Define the characters of each key char keys[ROWS][COLS] = { {'1','2','3','+'}, {'4','5','6','-'}, {'7','8','9','*'}, {'C','0','=','/'} }; // Arduino pins connected to keypad rows byte rowPins[ROWS] = {9, 8, 7, 6}; // Arduino pins connected to keypad columns byte colPins[COLS] = {5, 4, 3, 2}; // Create keypad object Keypad keypad = Keypad(makeKeymap(keys), rowPins, colPins, ROWS, COLS); // ---------------- Variables ---------------- // Variable to store the mathematical expression entered by the user String expression = ""; // ---------------- SETUP ---------------- void setup() { lcd.init(); // Initialize the LCD lcd.backlight(); // Turn on the LCD backlight lcd.clear(); // Clear the screen // Display startup message lcd.setCursor(0,0); lcd.print("Arduino Calculator"); delay(10000); // Wait for 10 seconds lcd.clear(); // Clear the screen } // ---------------- Calculation function ---------------- // This function evaluates the mathematical expression float calculer(String exp) { // Arrays to store numbers and operators float nombres[10]; char ops[10]; int nCount = 0; // Number counter int oCount = 0; // Operator counter // ---- Expression parsing ---- // Example: "12+3*4" // nombres = {12,3,4} // ops = {'+','*'} String temp = ""; for (int i = 0; i < exp.length(); i++) { char c = exp[i]; // If the character is a digit, add it to the temporary number if (isdigit(c)) { temp += c; } // If the character is an operator else { nombres[nCount++] = temp.toFloat(); // Store the number ops[oCount++] = c; // Store the operator temp = ""; // Reset temporary string } } // Store the last number nombres[nCount++] = temp.toFloat(); // ---- Handle multiplication and division first ---- // These operations have higher priority for (int i = 0; i < oCount; i++) { if (ops[i] == '*' || ops[i] == '/') { float res; if (ops[i] == '*') res = nombres[i] * nombres[i+1]; else res = nombres[i] / nombres[i+1]; // Replace the two numbers with the result nombres[i] = res; // Shift numbers to the left for (int j = i + 1; j < nCount - 1; j++) nombres[j] = nombres[j + 1]; // Shift operators to the left for (int j = i; j < oCount - 1; j++) ops[j] = ops[j + 1]; nCount--; oCount--; i--; } } // ---- Handle addition and subtraction ---- float resultat = nombres[0]; for (int i = 0; i < oCount; i++) { if (ops[i] == '+') resultat += nombres[i+1]; if (ops[i] == '-') resultat -= nombres[i+1]; } return resultat; // Return the final result } // ---------------- LOOP ---------------- void loop() { // Read the pressed key char touche = keypad.getKey(); // If a key is pressed if (touche) { // ---- Clear function ---- if (touche == 'C') { expression = ""; // Reset the expression lcd.clear(); // Clear the LCD } // ---- Calculate result ---- else if (touche == '=') { // Check if expression is not empty if (expression.length() > 0) { float res = calculer(expression); // Calculate result lcd.setCursor(0,2); lcd.print("= "); lcd.print(res); // Display result expression = ""; // Reset expression } } // ---- Add key to expression ---- else { expression += touche; // Add pressed key to expression lcd.setCursor(0,0); lcd.print(expression); // Display expression } } } |
0 comment
Leave a comment
Passion for robotics

Recent tutorials


Robotics workshop

Polpular tutorials


Making robots

Most commented tutorials


Robotic arm

Categories
Smart Home