Create a Super Mario Mobile Game with MIT App Inventor
Tutorial plan
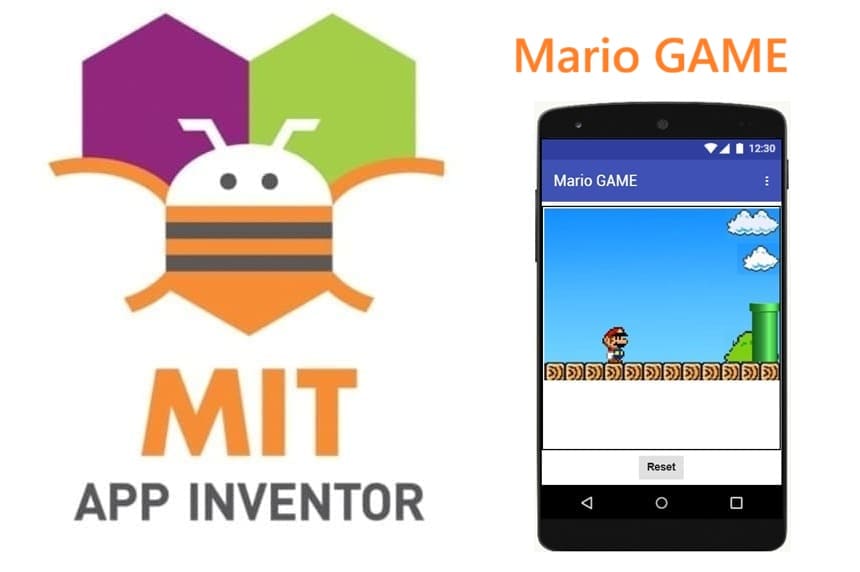
1- Presentation of Mario game
2- Objective of our Mario game mobile application
3- Description of application designer interface
4- Description of application blocks part
Presentation of Mario game
The Mario game is a classic side-scrolling platformer where the player controls the main character, Mario, navigating through various levels filled with obstacles, enemies, and challenges. The goal is to reach the end of the level safely while avoiding hazards and collecting items.
Mario games combine quick reflexes, timing, and strategic jumping, making them engaging and fun for players of all ages. The combination of colorful graphics, smooth animations, and intuitive controls makes it one of the most beloved game franchises worldwide.
Objective of our Mario game mobile application
The primary goal of our Mario game mobile application is to create an engaging side-scrolling platformer that is both fun for players and demonstrates game development concepts using MIT App Inventor. The objectives can be broken down as follows:
Character Control and Interaction:
Allow the player to control Mario’s actions, primarily running and jumping, using simple touch inputs or buttons.
Ensure that the controls are responsive and intuitive, providing a satisfying gameplay experience.
Obstacle Navigation and Challenge:
Introduce moving obstacles that Mario must avoid, increasing the challenge as the game progresses.
Implement collision detection so that touching an obstacle triggers a game-over scenario, adding stakes to the gameplay.
Animated Environments:
Use scrolling backgrounds, moving clouds, trees, and a looping ground to simulate forward motion, creating a dynamic and immersive game world.
Alternate images for the path or background to provide a sense of continuous motion.
Progress Tracking and Replayability:
Encourage the player to survive as long as possible and aim for the highest score or distance traveled.
Provide a reset mechanism to allow repeated playthroughs, promoting engagement and skill improvement.
Educational Purpose:
Demonstrate key game development principles in MIT App Inventor, such as:
Using clocks to animate sprites and backgrounds.
Managing collision events to detect interactions.
Handling sprite movement and environment loops.
Serve as a practical example for beginners learning mobile game development.
Entertainment and Engagement:
Deliver a fun, visually appealing, and interactive experience for players of all ages.
Encourage quick reflexes, timing, and strategic thinking, making the game both challenging and rewarding.
Description of application designer interface
The Application Designer Interface in MIT App Inventor is where you visually design and organize all the components of your Mario game. It plays a crucial role in structuring the game before adding logic with blocks.
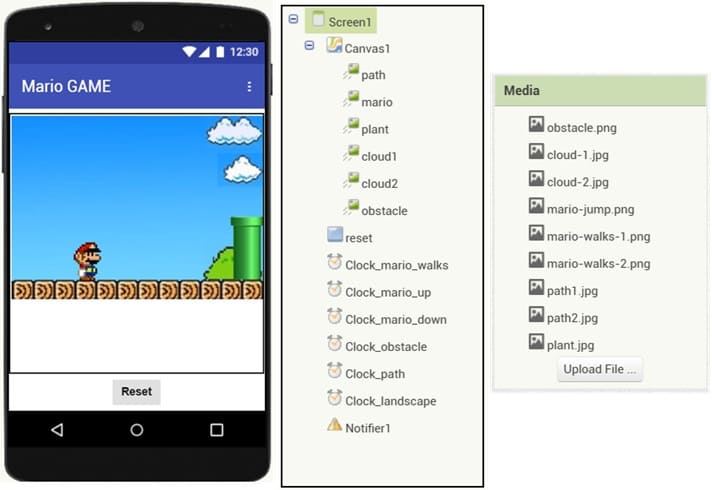
Here’s a detailed description of the elements of the Mario game interface in MIT App Inventor, including visible and non-visible components:
1. Canvas
The Canvas is the main area where the game action takes place.
All sprites (Mario, obstacles, clouds, plants, etc.) are placed on it.
It supports movement, collisions, and drawing, making it essential for a side-scrolling game.
2. Path sprite
The Path represents the ground or floor that Mario runs on.
It is usually a sprite or an image that scrolls horizontally using Clock_path to simulate forward movement.
Alternating images can be used to create an animation effect of the moving path.
3. Mario sprite
The main character controlled by the player.
Can move up and down during jumps and stays horizontally fixed while the background scrolls.
Its movement is animated with clocks: Clock_mario_up, Clock_mario_down, and Clock_mario_walks.
4. Clouds sprites
Decorative elements in the background to create a lively environment.
Move slowly from right to left using Clock_landscape to simulate depth (parallax effect).
5. Plant sprite
Part of the scenery, also moved by Clock_landscape to create a scrolling background.
Adds visual depth and makes the environment more engaging.
6. Obstacle sprite
Represents challenges that Mario must avoid (e.g., pits, enemies, spikes).
Moves from right to left using Clock_obstacle.
Colliding with obstacles triggers the game over sequence via Mario.CollisionWith.
7. Reset button
Allows the player to restart the game after losing.
Initially hidden and displayed only when Mario collides with an obstacle.
When clicked, it calls a reset procedure to reinitialize positions, visibility, and clocks.
8. Clocks
Clock_mario_walks: Animates Mario’s walking movement.
Clock_mario_up: Controls the upward motion during Mario’s jump.
Clock_mario_down: Controls the downward motion to land after a jump.
Clock_obstacle: Moves obstacles from right to left across the screen.
Clock_path: Scrolls the ground/path under Mario to simulate running.
Clock_landscape: Animates background elements like clouds, trees, and scenery.
9. Notifier1
Used to display messages to the player, such as “Game Over” or instructions.
Can also provide alerts or tips during gameplay.
Description of application blocks part
The Blocks Editor is where all the logic, interactions, and behavior of the game are programmed. While the Designer Interface sets up what the player sees, the Blocks part defines how everything behaves during gameplay.
Complete program for the Mario Game

Explanation of the program
1- reset procedure
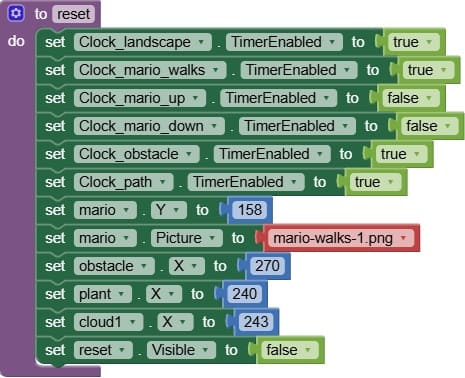
The reset procedure is a key function that initializes or restarts the game whenever the player starts a new session or after losing.
The reset procedure ensures the game starts fresh and runs smoothly by:
- activating all clocks needed for gameplay,
- deactivating jump clocks to prevent unintended movement,
- placing Mario, obstacles, plants, and clouds in their initial positions,
- preparing the interface for a new play session.
2- Screen1.initialize event
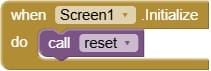
The Screen1.Initialize event in MIT App Inventor is triggered automatically when the game screen loads, i.e., when the player opens the app or starts the game.
It calls the reset procedure as soon as the screen is displayed.
3- when reset.Click event
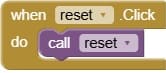
The reset.Click event in MIT App Inventor is triggered when the player clicks the Reset button during gameplay, usually after losing or completing a game session.
It calls the reset procedure to reinitialize all game elements.
4- when Clock_mario_walks
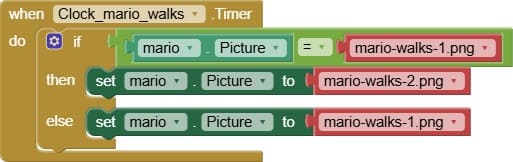
The Clock_mario_walks component is used to animate Mario’s walking motion by alternating between two images: mario-walks-1 and mario-walks-2.
At each tick of Clock_mario_walks (each time the timer fires), the event checks which walking image is currently displayed.
Alternating Images:
If mario-walks-1 is currently shown, it switches to mario-walks-2.
If mario-walks-2 is currently shown, it switches back to mario-walks-1.
Rapidly alternating between these two images gives the illusion that Mario is walking or running in place, while the background and path scroll under him.
5- when Clock_mario_up
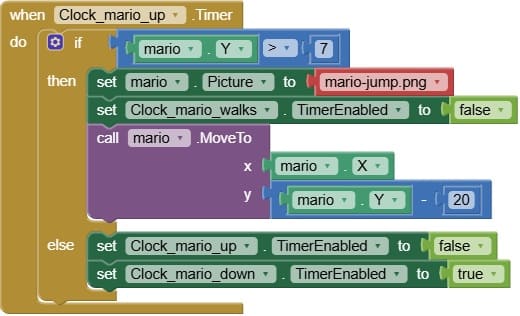
The Clock_mario_up component is used to animate Mario’s upward movement during a jump.
At each tick of the clock, the Y-coordinate of Mario decreases, moving him upward on the screen.
The movement continues incrementally to create a smooth jump animation.
Reaching Maximum Height:
The event typically checks if Mario has reached the maximum jump height.
Once this height is reached, Clock_mario_up is deactivated and Clock_mario_down is activated to start the downward movement.
5- when Clock_mario_down
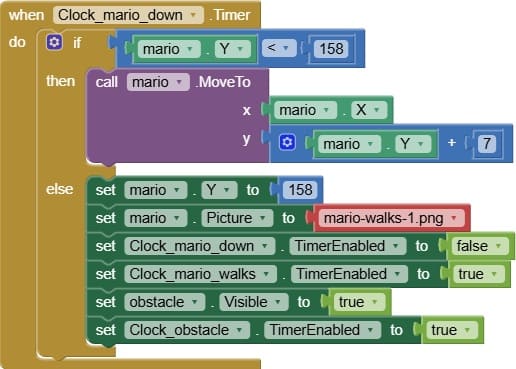
The Clock_mario_down component is used to animate Mario’s downward movement after a jump, allowing him to land smoothly back on the ground.
At each tick of the clock, the Y-coordinate of Mario increases, moving him downward on the screen.
This creates a smooth descent animation.
The event checks when Mario reaches the ground level.
Once Mario touches the ground, Clock_mario_down is deactivated, stopping the downward movement and Clock_mario_walks is activated.
6- when mario.Touched
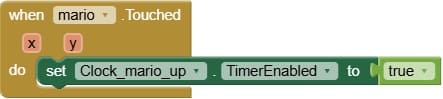
The mario.Touched event is triggered when the player taps or touches Mario’s sprite on the screen.
It activates Clock_mario_up, making Mario jump when touched.
The mario.Touched event allows the player to interact directly with Mario, usually to make him jump, providing an intuitive and interactive control mechanism.
7- when Clock_path.Timer
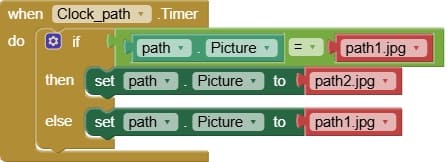
The Clock_path.Timer event alternates between the two path images (path1 and path2) to simulate a continuously moving ground, making Mario’s running appear more realistic.
At each tick of Clock_path (each timer event), the event checks which path image is currently displayed.
Alternating Images:
If path1 is currently shown, it switches to path2.
If path2 is currently shown, it switches back to path1.
Rapidly alternating between these two images simulates the ground moving beneath Mario, enhancing the illusion that he is running forward.
8- when Clock_landscape.Timer
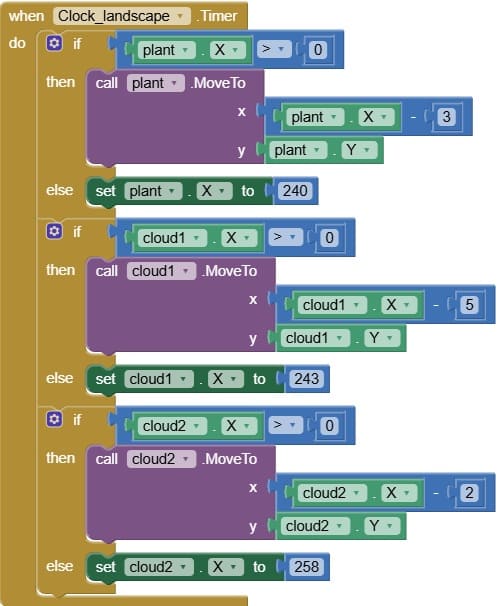
The Clock_landscape.Timer event animates clouds and plants, moving them across the screen to create a continuously scrolling background and enhance the feeling of forward movement in the game.
At each tick of the timer, the X-coordinate of clouds and plants decreases, moving them from right to left across the screen.
When a cloud or plant moves completely off the screen on the left, it is repositioned to the right to re-enter the scene.
This creates a looping, continuous animation, simulating a scrolling background.
9- when Clock_obstacle.Timer
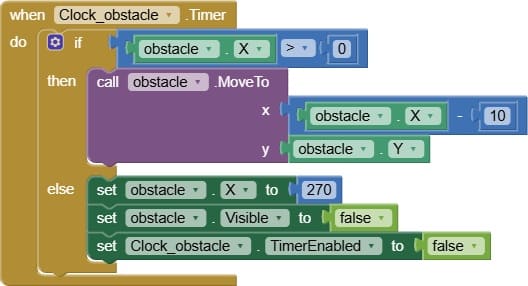
The Clock_obstacle.Timer event animates obstacles moving toward Mario, ensuring continuous gameplay and providing the main challenge that the player must avoid to stay alive.
At each tick of the timer, the X-coordinate of each obstacle decreases, moving it from the right side of the screen toward Mario.
When an obstacle moves completely off the left side of the screen, it is repositioned to the right, creating a loop of incoming obstacles.
10- when mario.CollideWith
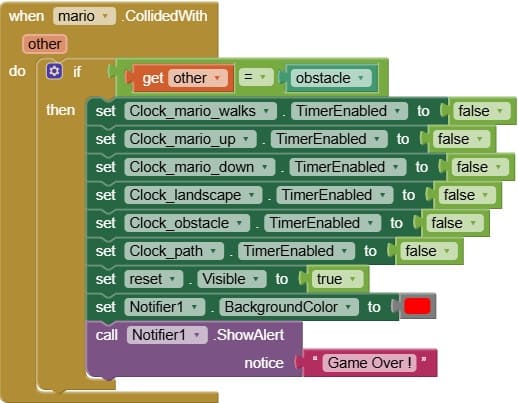
The mario.CollideWith event is triggered when Mario comes into contact with another sprite, such as an obstacle. It is essential for detecting collisions and managing game-over conditions.
How it works ?
Checks if Mario has touched or collided with an obstacle, enemy, or any harmful object.
Stops all relevant clocks (Clock_mario_walks, Clock_path, Clock_landscape, Clock_obstacle, etc.) to freeze the game.
Displays a Game Over message using Notifier1 or a visible label.
Shows the Reset button, allowing the player to restart the game.

Passion for robotics

Recent tutorials


Robotics workshop

Polpular tutorials


Making robots

Most commented tutorials


Robotic arm

Categories
Smart Home