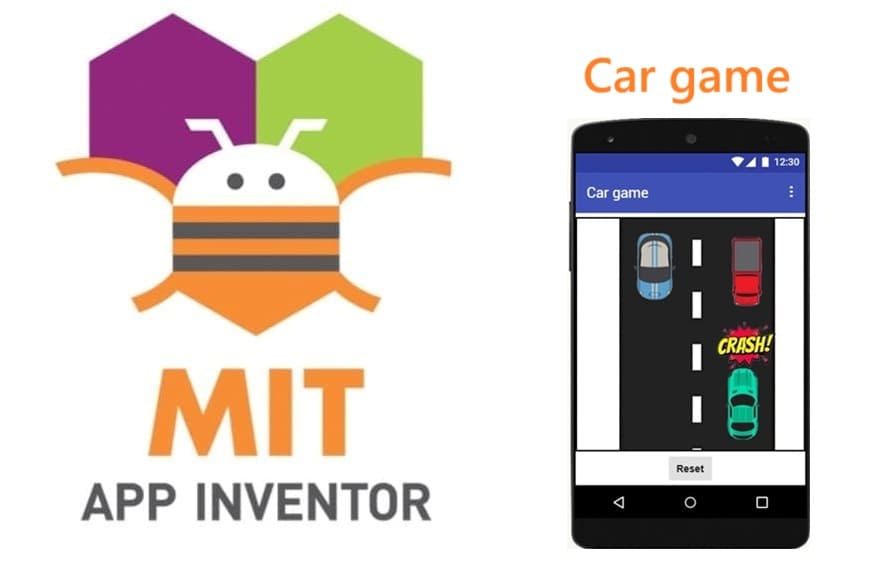
Car Game with Obstacles – MIT App Inventor Full Guide
Tutorial plan
1- Presentation of Car with Obstacles Game
2- Objective of Car Game mobile application
3- Description of application designer interface
4- Description of application blocks part
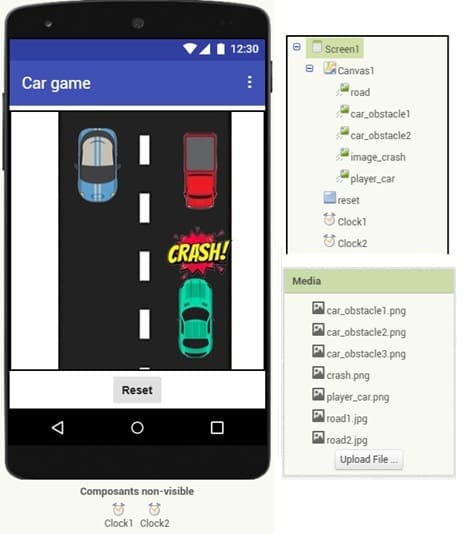
Presentation of Car Game with Obstacles Game
The Car Game with Obstacles is a simple yet engaging game where the player controls a car that must navigate a road while avoiding various obstacles. Here’s a general description of how it works:
1- Player Car
A small car is positioned at the bottom of the screen. The player can move it left or right to avoid hitting obstacles.
Controls can be via:
- Touch (tapping the screen sides)
- Buttons
- Joystick
2- Obstacles
Objects (like other cars, traffic cones, rocks) appear from the top of the screen and move downward toward the player’s car.
Their position and speed can vary to increase difficulty.
3- Road Animation
The background road may scroll to create the illusion of movement.
Objective of Car Game mobile application
The objective of the Car Game mobile application is to design and program an engaging, interactive game in which the player controls a virtual car moving along a scrolling road while avoiding randomly generated obstacles. The primary goal for the player is to survive as long as possible without colliding with any obstacle, thereby achieving the highest possible score or longest survival time.
In the context of MIT App Inventor, this objective involves:
1- Player Control
Allowing the player to move the car horizontally (change its X position) using touch events, on-screen buttons, or tilting the device (accelerometer).
2- Obstacle Generation and Movement
Using Clock components to regularly update obstacle positions so they move downward, simulating the road’s motion.
Randomizing obstacle positions to create unpredictability and increase challenge.
3- Collision Detection
Implementing the ImageSprite.CollidedWith event to detect when the player’s car hits an obstacle, which ends the game.
4- Game Over and Reset
When a collision occurs, displaying a crash image, disabling timers, and showing a reset button to allow the player to restart.
Description of application designer interface
The Designer interface is the part of MIT App Inventor where you visually design the mobile application's layout and add components that will later be programmed in the Blocks Editor.
Description of the components for the Car Game
1- Canvas
The main play area where the road, the player’s car, and obstacles are displayed.
Used to detect collisions between objects and control their movement.
2- ImageSprite – Player’s Car
Represents the car controlled by the player.
Can move left or right based on player input.
3- ImageSprite – Obstacles cars
Represent incoming objects (e.g., other cars, cones) that the player must avoid.
Move downward to simulate the motion of the road.
4- ImageSprite – image_crash
Used to show the crash effect when the player’s car collides with an obstacle.
5- ImageSprite – road
The image of the road or scenery placed behind the game objects to give a driving effect.
6- Button – Reset
Allows the player to restart the game after a crash.
7- Clock1
Animates the road or background to simulate forward movement.
8- Clock2
Moves obstacles downward and resets them to the top when they go off-screen.
These components are added and positioned visually in the Designer before writing the logic in the Blocks Editor.
The properties of each component (size, color, image, speed) are configured here to prepare them for game programming.
Description of application blocks part
In MIT App Inventor, the role of the Application Blocks part is to create the logic and functionality of the mobile application by programming how the components behave and interact.
The full program of application
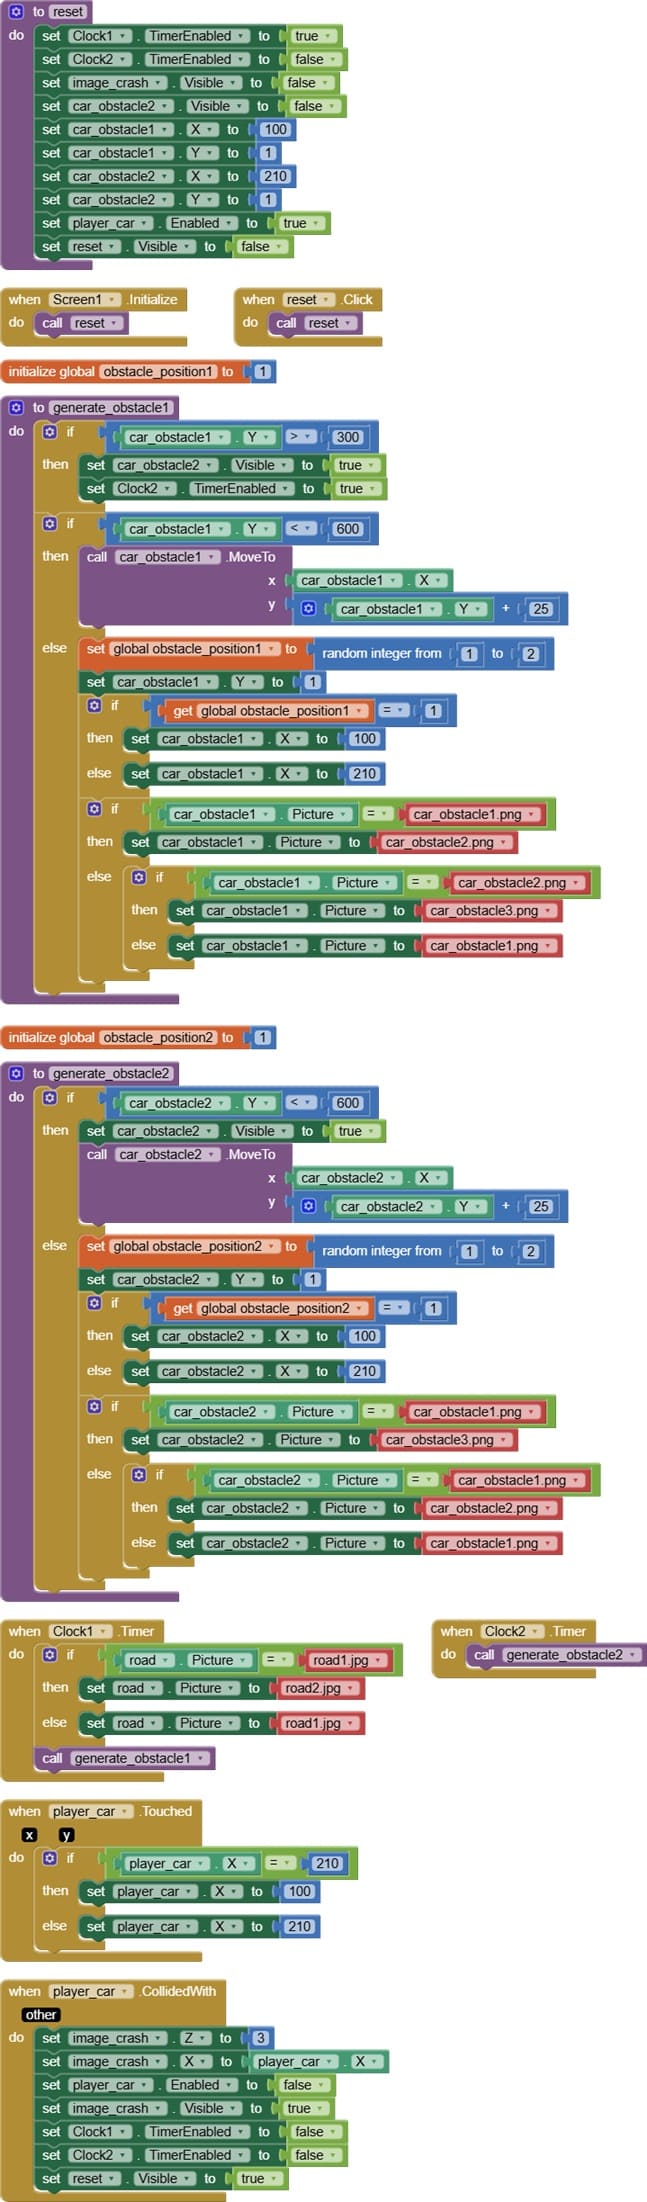
Description of program
1- Reset procedure
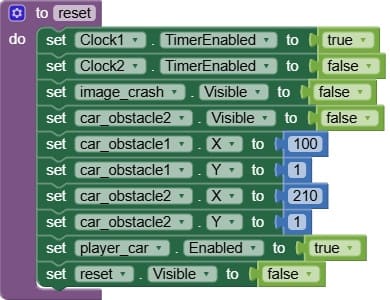
The Reset procedure is a set of instructions that restores the game to its initial state, allowing the player to start a new round after a crash or game over. It is triggered when the player clicks the Reset button.
Main Functions of the Reset Procedure:
- Reset obstacles (car_obstacle1, car_obstacle2, etc.) to their starting Y positions (off-screen top) and random X positions (lanes).
- Make the image_crash sprite invisible to remove the crash image from the screen.
- Re-enable any disabled controls (e.g., allow player movement again).
- Restart all relevant Clock timers to resume obstacle movement and road animation.
- Hide the Reset button itself until the next crash occurs.
2- Screen1.Initialize
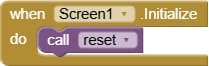
Screen1.Initialize is an event that triggers automatically when the app’s main screen loads or restarts (i.e., when the user opens the app or returns to this screen).
Screen1.Initialize calls the Reset procedure to initialize and set up the game cleanly at startup, ensuring the player begins with a fresh game environment.
3- Reset.Clock
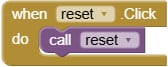
The Reset.Click event is triggered when the player taps the Reset button after a game over or crash.
The Reset.Click event calls the Reset procedure to restart the game cleanly when the player wants to play again after crashing.
4- Obstacle_position_1 variable
The variable obstacle_position_1 stores the horizontal position (X coordinate) of the first obstacle on the road.It determines which lane or X-coordinate the first obstacle will appear in on the canvas.
It determines which lane or X-coordinate the first obstacle will appear in on the canvas.
5- generate_obstacle1 procedure

The generate_obstacle1 procedure is responsible for creating, positioning, and managing the behavior of the first obstacle in the game.
When car_obstacle1.Y becomes greater than 300 (meaning it has moved sufficiently down the screen), the procedure makes the second obstacle (car_obstacle2) visible or active.
Main functions include:
- Setting the initial position of obstacle 1, typically by assigning its X coordinate to one of the predefined lanes using a random value for variety.
- Resetting the obstacle’s position to the top of the screen after it moves off the bottom, making it reappear for continuous gameplay.
- Updating the obstacle’s movement so it moves downward at a set speed, simulating the car driving forward.
The generate_obstacle1 procedure controls the creation, positioning, and movement of the first obstacle to keep the game challenging and dynamic.
4- Obstacle_position_1 variable
The variable obstacle_position_2 stores the horizontal position (X coordinate) of the second car_obstacle on the road.It determines which lane or X-coordinate the first obstacle will appear in on the canvas.
It determines which lane or X-coordinate the first obstacle will appear in on the canvas.
5- generate_obstacle2 procedure
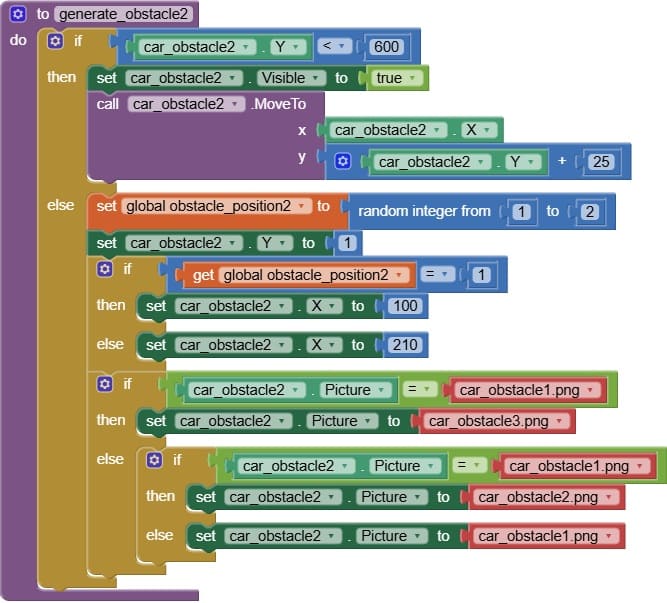
Similar to generate_obstacle1, the generate_obstacle2 procedure manages the behavior of the second obstacle in the game.
Key responsibilities include:
- Setting the starting position of obstacle 2 by randomly choosing an X coordinate (lane) at the top of the screen.
- Moving the obstacle downward gradually to simulate the motion of the road and the car moving forward.
- Resetting the obstacle’s position to the top with a new random lane once it moves off the bottom of the screen, ensuring continuous obstacle appearance.
6- Clock1.Timer
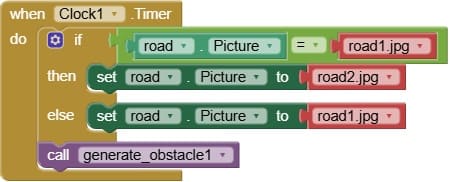
Clock1.Timer triggers repeatedly at a set interval (e.g., every 100 ms) to create the illusion of movement by animating the road background.
This can be done by alternately switching between two road images or by scrolling the road image vertically, making it look like the car is driving forward.
By calling generate_obstacle1 Procedure: each timer tick also calls the generate_obstacle1 procedure to move the first obstacle downward on the screen.
7- Clock2.Timer
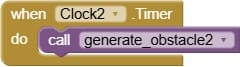
The Clock2.Timer event fires repeatedly at fixed intervals (e.g., every 100 milliseconds), acting as a game loop for the second car obstacle.
On each timer tick, Clock2.Timer:
Calls the generate_obstacle2 procedure to update the position and behavior of the second obstacle.
8- Player_car.Touched
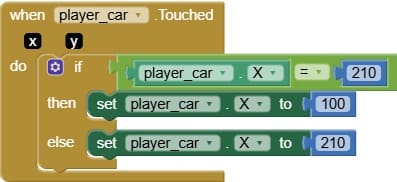
The player_car.Touched event is triggered when the player taps or touches the player’s car sprite on the screen.
In this event, you can program logic to move the car left or right to help the player dodge obstacles.
It detects where the screen or car was touched (e.g., left side or right side).
It changes the player_car.X coordinate accordingly:
If touched on the left side → move the car a set number of pixels to the left (without going off-screen).
If touched on the right side → move the car to the right similarly.
This allows simple, intuitive control by tapping the car itself to steer it left or right.
9- Player_car.CollideWith
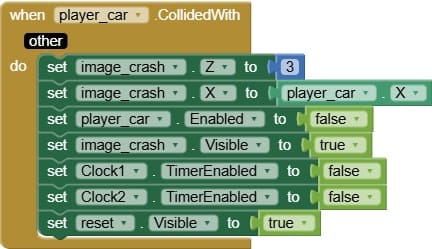
The player_car.CollidedWith event is triggered when the player’s car sprite collides with an obstacle (another sprite like car_obstacle1 or car_obstacle2).
When this collision happens, the event’s role is to:
- show the crash image (image_crash) at the collision location to visually indicate the crash.
- display the Reset button to allow the player to restart the game.
- disable the player_car to prevent further movement or interaction.
- stop the game timers (Clock1, Clock2) to freeze all animations, obstacle movements, and road scrolling, effectively pausing the game.
This combination provides clear feedback that the game is over and waits for the player to choose to restart.
1 comment

iesme 10-08-2525
Thanks for sharing. Please also share the sprites used in your program
Leave a comment
Passion for robotics

Recent tutorials
Robotics workshop

Polpular tutorials


Making robots

Most commented tutorials


Robotic arm

Categories
Smart Home