Building an obstacle detection project with ESP8266 NodeMCU and HC-SR04
Tutorial plan
1- Objective of the tutorial
2- Operation of the obstacle detection system
3- The necessary components
4- ESP8266 Assembly with I2C LCD Display and HC-SR04 sensor
5- Program ESP8266 NodeMCU with MicroPython
Objective of the tutorial
The objective of this tutorial is to design and implement an obstacle detection system using the ESP8266 NodeMCU microcontroller and the HC-SR04 ultrasonic sensor to measure distance between the system and nearby objects.
The system will visually and audibly alert the user when an obstacle is detected within a certain range:
- the LED will light up to indicate the presence of an obstacle.
- the buzzer will emit a sound warning depending on the detected distance.
- the LCD I2C display will continuously show the measured distance in real time.
This project helps users understand how to integrate sensors, indicators, and displays with the ESP8266 using MicroPython, and demonstrates the fundamental principles of distance measurement and obstacle detection in embedded systems.
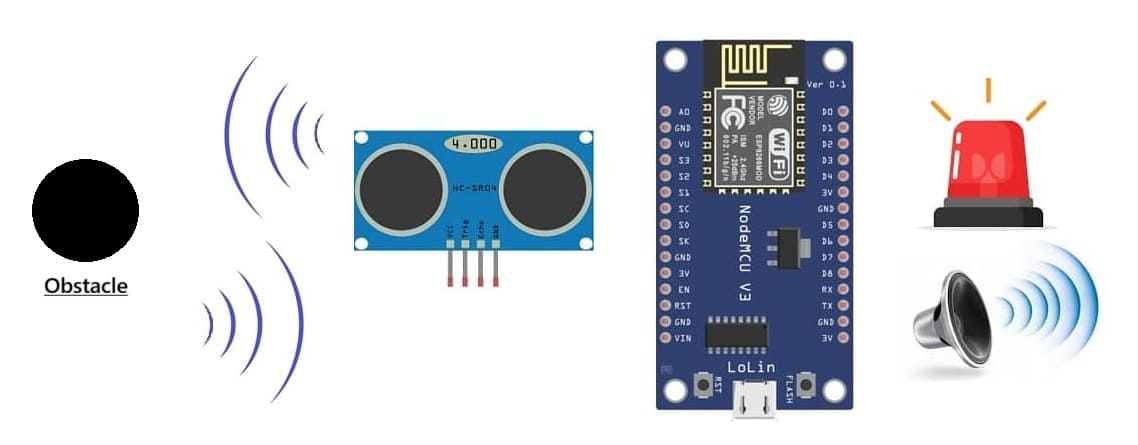
Operation of the obstacle detection system
The obstacle detection system operates based on ultrasonic distance measurement using the HC-SR04 sensor connected to the ESP8266 NodeMCU.
1- Distance Measurement:
The ESP8266 sends a short trigger pulse (10 µs) to the TRIG pin of the HC-SR04 sensor.
The sensor emits ultrasonic waves that travel through the air and bounce back when they hit an obstacle.
The ECHO pin of the sensor returns a pulse whose duration corresponds to the time taken for the sound waves to travel to the obstacle and back.
The ESP8266 measures this pulse duration and calculates the distance.
2- Data Processing:
The ESP8266 continuously monitors the measured distance and compares it with a threshold value (for example, 20 cm).
If the distance is greater than the threshold, the system considers the area clear.
If the distance is less than or equal to the threshold, an obstacle is detected.
3- Visual and Audible Alerts:
When an obstacle is detected:
The LED turns ON to visually signal the obstacle.
The buzzer emits a beep or continuous tone to alert the user.
When no obstacle is detected:
The LED remains OFF, and the buzzer stays silent.
4- Display on LCD I2C Screen:
The LCD I2C display shows the measured distance in centimeters in real time.
It may also display a message such as “Obstacle Detected!” or “Path Clear” depending on the situation.
This simple yet efficient operation demonstrates how the ESP8266 can integrate sensor data acquisition, signal processing, and output control to build a complete obstacle detection system.
The necessary components
To build the obstacle detection system with ESP8266 NodeMCU, HC-SR04, LED, buzzer, and LCD I2C screen, you will need the following components:
1- ESP8266 NodeMCU Board
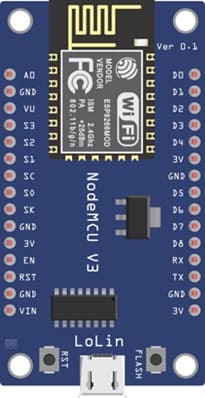
It serves as the main controller of the system.
It Sends and receives signals to measure distance, control the LED and buzzer, and display data on the LCD.
2- HC-SR04 Ultrasonic Sensor
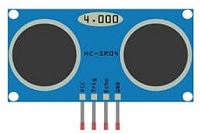
It is used to measure the distance between the sensor and an obstacle.
It operates by sending ultrasonic waves and measuring the time taken for their echo to return.
3- LED (Light Emitting Diode)
![]()
It provides a visual indication when an obstacle is detected.
It turns ON when the object is within the defined threshold distance.
4- Buzzer
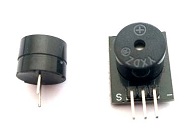
It generates an audible alert to warn the user of nearby obstacles.
Can produce continuous or intermittent sound depending on the distance.
5- LCD I2C Display (20x4)

Displays the measured distance in centimeters.
The I2C interface reduces the number of required connections to the ESP8266.
6- Breadboard
Used for prototyping the circuit without soldering.
Allows easy insertion and connection of components.
7- Jumper Wires

Ensure electrical connections between the ESP8266, sensor, buzzer, LED, and LCD display.
ESP8266 Assembly with I2C LCD Display and HC-SR04 sensor
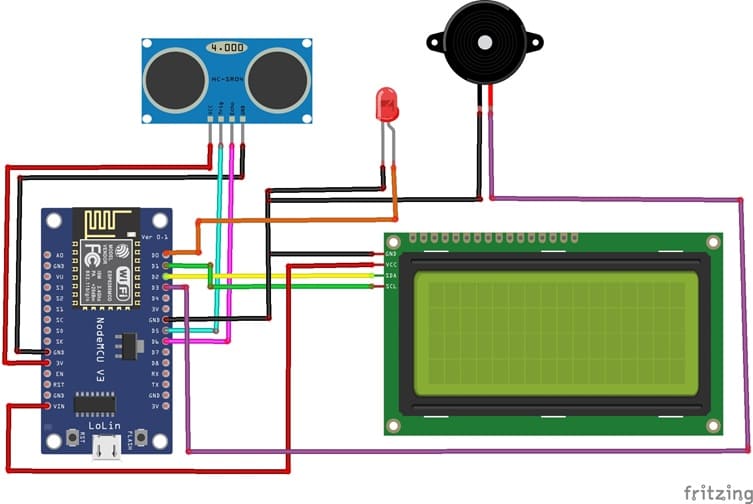
Attaching the I2C LCD Display :
- connect the VCC pin of the display to 5V pin of the ESP8266
- connect the GND pin of the display to GND pin of the ESP8266
- connect the SDA pin of the display to D2 (GPIO4) pin of the ESP8266
- connect the SCL pin of the display to D1 (GPIO5) pin of the ESP8266
Attaching the HC-SR04 sensor :
- Connect the VCC(+) pin of the HC-SR04 ultrasonic sensor to the 3.3V pin on the ESP8266 board.
- Connect the Trig pin of the HC-SR04 ultrasonic sensor to D5 (GPIO14) pin on the ESP8266 board.
- Connect the Echo pin of the HC-SR04 ultrasonic sensor to D6 (GPIO12) pin on the ESP8266 board.
- Connect the GND(-) pin of the HC-SR04 ultrasonic sensor to any ground (GND) pin on the ESP8266 board.
Attaching the buzzer :
- Connect the (+) terminal of buzzer to D3 (GPIO0) pin on the ESP8266 board.
- Connect the (-) terminal of buzzer to GND pin on the ESP8266 board.
Attaching the red LED :
- Connect the negative terminal (cathode) of each LED to the ground (GND) of the ESP8266 board.
- Connect the positive terminal (anode) of the LED to the D0 (GPIO16) pin of the ESP8266 board.
Program ESP8266 NodeMCU with MicroPython
To program an obstacle detection system using HC-SR04, a buzzer, an LED, and an ESP32 with Micropython, you'll need to follow these steps.
1- import this library : hc-sr04 for HC-SR04 sensor
2- import this two libraries : i2c_lcd and lcd_api for I2C LCD screen
3- Create a new Python script and write the following code :
|
1 2 3 4 5 6 7 8 9 10 11 12 13 14 15 16 17 18 19 20 21 22 23 24 25 26 27 28 29 30 31 32 33 34 35 36 37 38 39 40 41 |
import machine from machine import Pin, SoftI2C from lcd_api import LcdApi from i2c_lcd import I2cLcd from hcsr04 import HCSR04 import time # Configure I2C for LCD screen I2C_ADDR = 0x27 totalRows = 4 totalColumns = 20 i2c = SoftI2C(scl=Pin(5), sda=Pin(4), freq=10000) #initializing the I2C method for ESP8266 lcd = I2cLcd(i2c, I2C_ADDR, totalRows, totalColumns) # Configure HC-SR04 pins sensor = HCSR04(trigger_pin=14,echo_pin=12,echo_timeout_us=1000000) # Configure buzzer and led pins redled_pin=Pin(16, Pin.OUT) buzzer_pin=Pin(0, Pin.OUT) while True: #calculate distance between the HC-SR04 sensor and an obstacle distance = sensor.distance_cm() print('distance= ',distance,' cm') # Check if obstacle is detected if (distance < 3): # detect an obstacle # Activate buzzer and LED redled_pin.value(1) buzzer_pin.value(1) # show alert message on LCD I2C display lcd.move_to(1,0) lcd.putstr("attention!!") lcd.move_to(1,1) lcd.putstr("Obstacle detected") else: # Disable buzzer and LED redled_pin.value(0) buzzer_pin.value(0) lcd.clear() time.sleep_ms(100) |
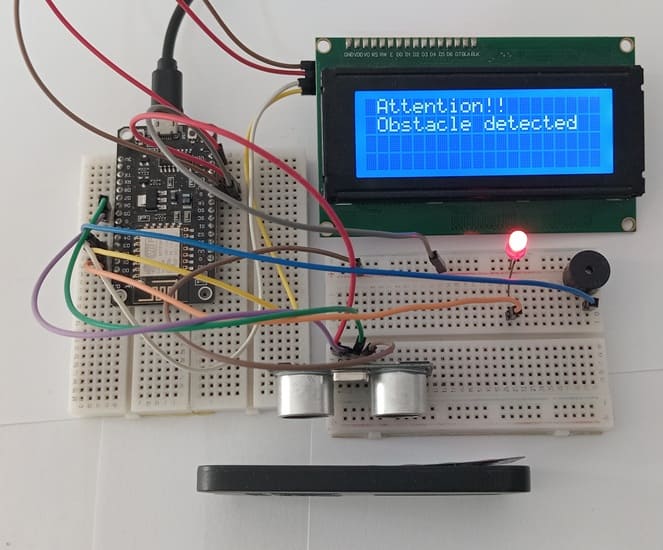
If the HC-SR04 ultrasonic sensor detects an obstacle, the ESP8266 board turns on the LED, sounds the buzzer and displays an alert message on the I2C LCD display. Otherwise, the ESP8266 board turns off the LED, stops the buzzer and clears the alert message.
0 comment
Leave a comment
Passion for robotics

Recent tutorials


Robotics workshop

Polpular tutorials


Making robots

Most commented tutorials


Robotic arm

Categories
Smart Home