Project : DIY coin dispensing machine using Arduino UNO

Tutorial plan
1- Objective of the project
2- Required Components
3- Circuit Connections of system
4- Arduino program of system
Objective of the project
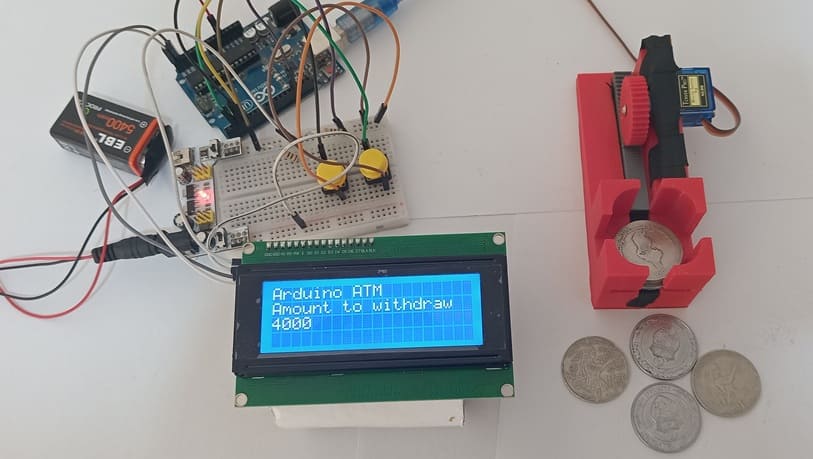
The objective of this project is to design and implement a DIY coin dispensing machine controlled by an Arduino UNO, capable of automatically releasing a user-defined number of coins. The system uses two push buttons to allow user interaction, a servo motor to actuate a mechanical dispensing mechanism, and an LCD I2C display to provide real-time feedback.
The project aims to achieve precise and repeatable coin dispensing by synchronizing electronic control with mechanical movement. The Arduino UNO processes user inputs, manages the dispensing logic, and ensures that the servo motor releases exactly one coin per actuation cycle. Additionally, the LCD I2C display enhances usability by showing the selected number of coins and system status messages.
This project also serves as a practical application of embedded systems, combining programming, hardware interfacing, and mechanical design to create a functional automated device.
Functioning
The system operates in a sequential and controlled manner. Initially, the machine is in an idle state, and the LCD I2C display shows a default message such as “Ready” or “Select coins.” The user interacts with the system using two push buttons: one button is used to increment or select the number of coins to be dispensed, while the second button is used to confirm the selection and start the dispensing process.
When the increment button is pressed, the Arduino UNO updates the coin count and displays the new value on the LCD. To ensure reliable operation, button inputs are processed with debouncing to avoid multiple unintended counts from a single press.
Once the user presses the confirmation button, the Arduino initiates the dispensing sequence. The servo motor is driven to a predefined angle that activates the mechanical coin dispensing mechanism, allowing one coin to be released. The servo then returns to its initial position, completing one dispensing cycle. This process is repeated in a loop until the total number of selected coins has been dispensed.
During the dispensing process, the LCD I2C display shows messages such as “Dispensing…” along with the remaining or dispensed coin count. After all coins have been released, the system displays a completion message like “Done” and returns to the idle state, ready for the next operation.
The overall functioning relies on precise timing control of the servo motor, accurate counting of dispensing cycles, and proper synchronization between the electronic control system and the mechanical dispensing mechanism to ensure consistent and error-free operation.
Required Components
1. Arduino UNO

The Arduino UNO is the central control unit of the system, based on the ATmega328P microcontroller. It is responsible for executing the program logic, reading the state of the push buttons (digital inputs), controlling the servo motor (PWM output), and communicating with the LCD via the I2C protocol. It operates at 5V and provides multiple GPIO pins, making it suitable for interfacing with both input and output devices in this project.
2. Push Buttons
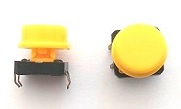
The push buttons are used as user input devices. One button is typically assigned to increment/select the number of coins, while the other is used to confirm and start dispensing. Electrically, each button is connected to a digital input pin of the Arduino, usually with a pull-down or pull-up resistor (internal or external) to ensure a stable logic level. Software debouncing is required to eliminate false triggering due to mechanical contact noise.
3. SG90 Servo Motor

The servo motor is an electromechanical actuator used to control the coin dispensing mechanism. It operates using a PWM signal from the Arduino, where the pulse width determines the angular position (typically between 0° and 180°). In this project, the servo rotates to a specific angle to release a single coin and then returns to its initial position. This controlled movement ensures precise and repeatable dispensing cycles.
4. Mechanical coin dispensing mechanism
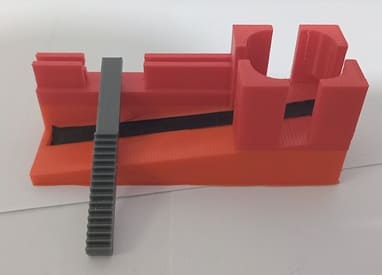
This is the physical subsystem responsible for holding and releasing coins one at a time. It is typically constructed using a rotating disk, gate, or sliding channel that allows only one coin to pass per actuation. The mechanism is directly driven by the servo motor. Proper design is critical to prevent jamming, ensure single-coin release, and maintain alignment with the servo’s motion.
5. LCD Display with I2C Module

The LCD I2C display is used to allow the system to show information to the user. It can display the selected amount.
6. Breadboard

A breadboard is used to assemble the circuit without soldering. It makes it easy to connect and modify the components during testing and development.
7. Jumper Wires

Jumper wires are used to connect the Arduino UNO, servo motor, and LCD display together. They ensure proper electrical connections between all components.
8. Power Supply Module
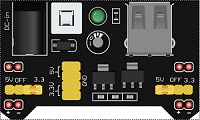
The 5V/3.3V power supply module provides the necessary electrical power to the electronic components used in the coin dispensing system. It converts the input voltage (for example from a 9V battery, USB supply, or external adapter) into stable 5V and 3.3V outputs required by different components.
9. 9V Battery
The 9V battery serves as the main energy source for the electronic system. It provides the electrical power needed to operate the components of the coin dispensing machine.
Circuit Connections of system
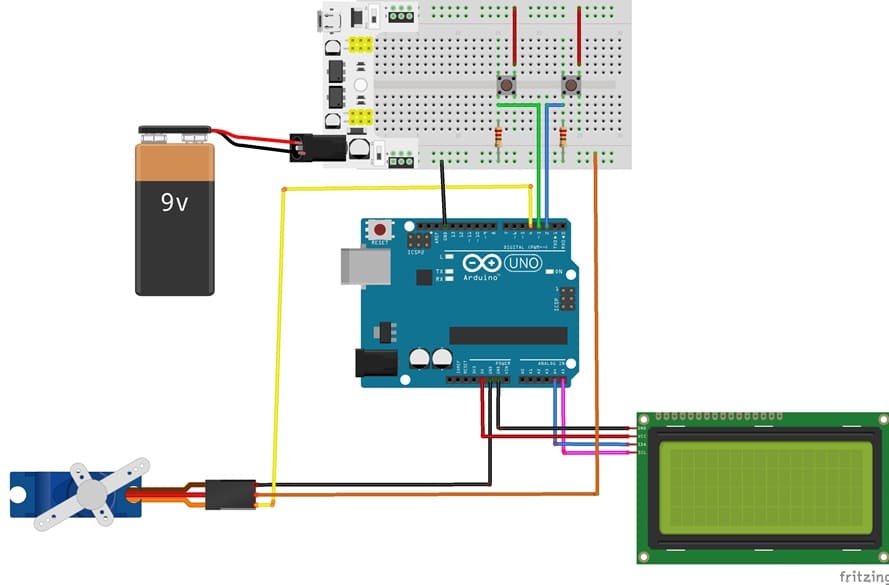
1- Connecting button 1 to Arduino UNO
| Button 1 | Carte Arduino |
|---|---|
| Leg | D2 |
| 10 kΩ resistor | between D2 and GND |
| Other leg | 3V from the power supply module |
2- Connecting button 2 to Arduino UNO
| Button 2 | Arduino UNO |
|---|---|
| Leg | D3 |
| 10 kΩ resistor | between D3 and GND |
| Other leg | 3V from the power supply module |
3- Connection of servo motor to Arduino UNO
| Serv motor | Arduino UNO |
|---|---|
| Red wire | 5V of supply power |
| Brown wire | GND |
| Yellow wire | D4 |
4- Connection of LCD I2C display to Arduino UNO
| LCD I2C display | Arduino UNO |
|---|---|
| VCC | 5V |
| GND | GND |
| SDA | A4 |
| SCL | A5 |
Arduino program of system
The program serves as the control software for a DIY coin dispensing machine using an Arduino UNO, an LCD I2C screen, two push buttons, a servo motor, and a mechanical coin dispensing mechanism. Its main role is to coordinate the interaction between the user, the electronic components, and the mechanical system to automatically dispense coins based on user input.
You need to install this libraries :
LiquidCrystal_I2C for I2C LCD screen
|
1 2 3 4 5 6 7 8 9 10 11 12 13 14 15 16 17 18 19 20 21 22 23 24 25 26 27 28 29 30 31 32 33 34 35 36 37 38 39 40 41 42 43 44 45 46 47 48 49 50 51 52 53 54 55 56 57 58 59 60 61 62 63 64 65 66 67 68 69 70 71 72 73 74 75 76 77 78 79 80 81 82 83 84 85 86 87 88 89 90 91 |
#include <LiquidCrystal_I2C.h> // Library to control the I2C LCD display #include <Servo.h> // Library to control the servo motor // Create LCD object: I2C address 0x27, 20 columns x 4 rows LiquidCrystal_I2C lcd(0x27, 20, 4); // Define pins for the two push buttons const int button1Pin = 2; // Button to increase the amount const int button2Pin = 3; // Button to start coin dispensing // Create Servo object Servo servo_motor; // Variables to store button states int button1State = 0; int button2State = 0; // Variable to store the amount to dispense int amount; void setup() { // Set button pins as input pinMode(button1Pin, INPUT); pinMode(button2Pin, INPUT); // Attach servo motor to pin 4 servo_motor.attach(4); // Initialize amount to 0 amount = 0; // Initialize the LCD lcd.init(); lcd.backlight(); // Turn on the LCD backlight lcd.clear(); // Clear the display // Display startup message lcd.setCursor(0, 0); lcd.print("Arduino ATM"); // Project title lcd.setCursor(0, 1); lcd.print("Amount to withdraw"); // Message indicating the amount lcd.setCursor(0, 2); lcd.print("0"); // Display the initial amount } void loop() { // Read the state of both buttons button1State = digitalRead(button1Pin); button2State = digitalRead(button2Pin); // If button 1 is pressed if (button1State == HIGH) { // Increase the amount by 1000 (example: 1000 millimes) amount = amount + 1000; // Display the new amount on the LCD lcd.setCursor(0, 2); lcd.print(amount); } // If button 2 is pressed if (button2State == HIGH) { // Loop to dispense coins based on the selected amount for (int i = 1; i <= (amount / 1000); i++) { // Rotate servo to push one coin servo_motor.write(150); delay(500); // Wait for the coin to be released // Return servo to initial position servo_motor.write(0); delay(500); // Wait before next coin } // Reset the amount after dispensing amount= 0; // Update the display lcd.setCursor(0, 2); lcd.print(amount); } // Small delay to avoid multiple rapid button readings delay(500); } |
0 comment
Leave a comment
Passion for robotics

Recent tutorials


Robotics workshop

Polpular tutorials


Making robots

Most commented tutorials


Robotic arm

Categories
Smart Home