Smart water level measurement with Arduino UNO and HC-SR04
Tutorial plan
1- Objective of the project
2- Required Components
3- Circuit Connections of system
4- Arduino program
Objective of the project
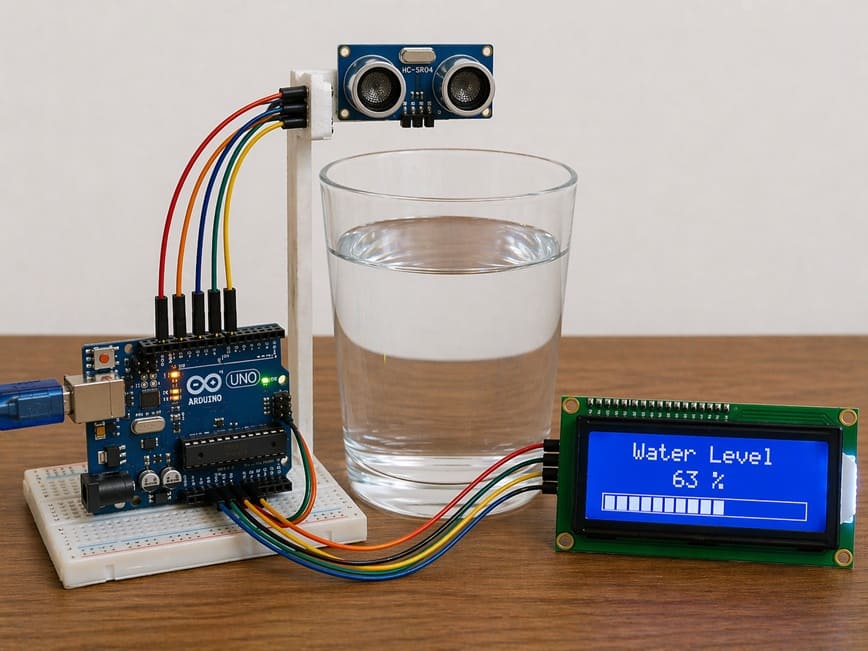
The objective of this project is to create a smart water level measurement system using an Arduino Uno, an HC-SR04 Ultrasonic Sensor, and an LCD display.
The system is designed to measure the water level in real time without direct contact with the liquid.
The measured level is then displayed on the LCD screen using graphical bars, allowing users to easily monitor the amount of water inside a tank, container, or reservoir.
Functionment
The HC-SR04 Ultrasonic Sensor is placed above the water tank to continuously send ultrasonic waves toward the water surface.
When these waves hit the water, they are reflected back to the sensor. The sensor calculates the distance between itself and the water surface based on the travel time of the ultrasonic waves.
Next, the Arduino Uno processes the received distance data and converts it into a water level value. According to the measured level, the Arduino generates graphical bars on the LCD display.
As the water level increases, more bars appear on the screen, and as the level decreases, fewer bars are displayed.
This graphical representation makes the monitoring system simple, clear, and user-friendly.
Required Components
1. Arduino UNO

The Arduino UNO is the main controller of the system. It receives the distance measurements from the ultrasonic sensor, processes the data, calculates the water level, and sends the results to the LCD display. It also controls the graphical bar display according to the measured water level.
2. HC-SR04 sensor
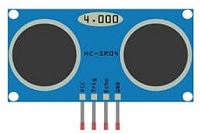
The HC-SR04 sensor is used to measure the distance between the sensor and the water surface. It sends ultrasonic waves toward the water and receives the reflected waves to calculate the water level.
3. LCD Display with I2C Module

The LCD display is used to show the measured water level in real time. It can display text information as well as graphical bars that represent the amount of water in the tank. This makes the monitoring system easy to understand and visually interactive.
4. Jumper Wires

Jumper wires are used to connect the Arduino UNO, FC-51 sensor, and LCD display together. They ensure proper electrical connections between all components.
Circuit Connections of system
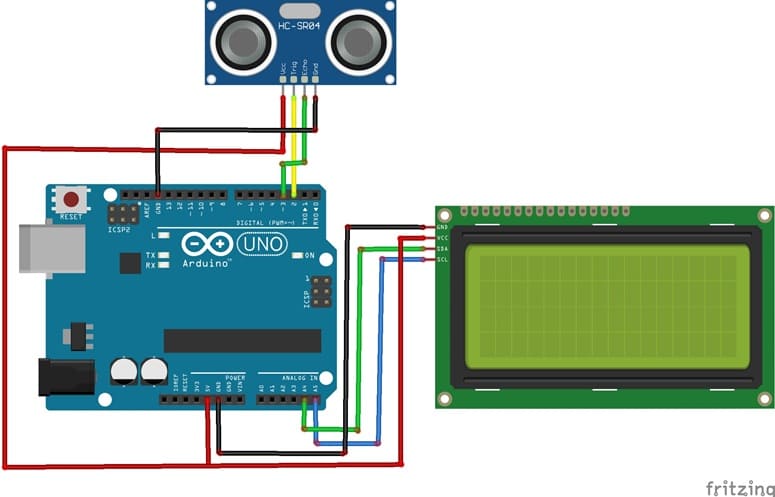

1- Connection of HC-SR04 sensor to Arduino UNO
| HC-SR04 sensor | Arduino UNO |
|---|---|
| VCC | 5V |
| GND | GND |
| Trig | D2 |
| Echo | D3 |
2- Connection of LCD I2C display to Arduino UNO
| LCD I2C display | Arduino UNO |
|---|---|
| VCC | 5V |
| GND | GND |
| SDA | A4 |
| SCL | A5 |
Arduino program of system
This Arduino program is designed to measure the water level in real time using an HC-SR04 Ultrasonic Sensor, an Arduino Uno, and an I2C LCD display. The system continuously calculates the amount of water inside a tank or container and displays the result as a percentage and as graphical bars on the LCD screen.
You need to install this library : LiquidCrystal_I2C for I2C LCD screen.
|
1 2 3 4 5 6 7 8 9 10 11 12 13 14 15 16 17 18 19 20 21 22 23 24 25 26 27 28 29 30 31 32 33 34 35 36 37 38 39 40 41 42 43 44 45 46 47 48 49 50 51 52 53 54 55 56 57 58 59 60 61 62 63 64 65 66 67 68 69 70 71 72 73 74 75 76 77 78 79 80 81 82 83 84 85 86 87 88 89 90 91 92 93 94 95 96 97 98 99 100 101 102 103 104 105 106 107 108 109 110 111 112 113 114 115 116 117 118 119 120 121 122 123 124 125 126 127 128 129 130 131 132 133 134 135 136 137 138 139 140 141 142 143 144 145 146 147 148 149 150 151 152 |
#include <Wire.h> // Library for I2C communication #include <LiquidCrystal_I2C.h> // Library for I2C LCD display // Initialize the I2C LCD display // I2C address = 0x27, LCD with 16 columns and 2 rows LiquidCrystal_I2C lcd(0x27, 16, 2); // ============================== // HC-SR04 Sensor Configuration // ============================== #define TRIG_PIN 2 // TRIG pin connected to digital pin 2 #define ECHO_PIN 3 // ECHO pin connected to digital pin 3 // Maximum height of the tank or glass (in cm) #define MAX_HEIGHT 8.5 // ============================== // Custom characters creation // for the progress bar display // ============================== // Empty bar byte bar0[8] = {0,0,0,0,0,0,0,0}; // 20% filled bar byte bar1[8] = {16,16,16,16,16,16,16,16}; // 40% filled bar byte bar2[8] = {24,24,24,24,24,24,24,24}; // 60% filled bar byte bar3[8] = {28,28,28,28,28,28,28,28}; // 80% filled bar byte bar4[8] = {30,30,30,30,30,30,30,30}; // 100% filled bar byte bar5[8] = {31,31,31,31,31,31,31,31}; // Variables for measurements long duration; // Echo return time float distance; // Measured distance void setup() { // Configure sensor pins pinMode(TRIG_PIN, OUTPUT); pinMode(ECHO_PIN, INPUT); // Initialize the LCD display lcd.init(); // Turn on the LCD backlight lcd.backlight(); // ============================== // Create custom LCD characters // ============================== lcd.createChar(0, bar0); lcd.createChar(1, bar1); lcd.createChar(2, bar2); lcd.createChar(3, bar3); lcd.createChar(4, bar4); lcd.createChar(5, bar5); // Display project title lcd.setCursor(0,0); lcd.print("Water Level"); } void loop() { // ============================== // Measure distance using HC-SR04 // ============================== // Send ultrasonic pulse digitalWrite(TRIG_PIN, LOW); delayMicroseconds(2); digitalWrite(TRIG_PIN, HIGH); delayMicroseconds(10); digitalWrite(TRIG_PIN, LOW); // Read echo return time duration = pulseIn(ECHO_PIN, HIGH); // Calculate distance in centimeters distance = duration * 0.034 / 2; // Calculate water level // 2.3 is used for sensor calibration adjustment float waterLevel = MAX_HEIGHT - (distance - 2.3); // Prevent negative values if (waterLevel < 0) waterLevel = 0; // Prevent values higher than maximum height if (waterLevel > MAX_HEIGHT) waterLevel = MAX_HEIGHT; // ============================== // Convert water level to percentage // ============================== int percent = (waterLevel / MAX_HEIGHT) * 100; // ============================== // Display percentage on LCD // ============================== lcd.setCursor(0,1); // Create display string String value_display = String(percent) + "% "; // Print percentage lcd.print(value_display); // ============================== // Display graphical progress bar // ============================== // Total number of bar segments int totalBars = 10; // Convert percentage into bar blocks int filled = map(percent, 0, 100, 0, totalBars * 5); // Set cursor position after percentage lcd.setCursor(5,1); // Loop to draw the 10 bar segments for (int i = 0; i < totalBars; i++) { // Calculate fill level of each segment int barLevel = filled - (i * 5); // Display corresponding custom character if (barLevel >= 5) lcd.write(5); // Fully filled bar else if (barLevel > 0) lcd.write(barLevel); // Partially filled bar else lcd.write(0); // Empty bar } // Wait before next measurement delay(500); } |
At the beginning of the program, the necessary libraries for I2C communication and LCD control are included. The LCD display is then initialized with its I2C address and screen dimensions. The TRIG and ECHO pins of the ultrasonic sensor are configured to allow the Arduino UNO to communicate with the sensor and measure distances.
The program also creates several custom LCD characters that represent different bar fill levels. These custom characters are used to build a graphical progress bar on the LCD display, making the water level visualization more interactive and easier to understand.
Inside the loop() function, the Arduino sends an ultrasonic pulse through the HC-SR04 sensor. The sensor measures the time taken for the ultrasonic waves to travel to the water surface and return back. Using this time, the Arduino calculates the distance between the sensor and the water surface.
Next, the program converts the measured distance into a water level value based on the maximum tank height. The water level is then transformed into a percentage value. This percentage is displayed on the LCD screen together with a graphical bar indicator that increases or decreases according to the amount of water detected in the container.
Finally, the system repeats the measurement every 500 milliseconds, allowing continuous real-time monitoring of the water level.

Passion for robotics

Recent tutorials


Robotics workshop

Polpular tutorials


Making robots

Most commented tutorials


Robotic arm

Categories
Smart Home