Lighting RGB LED module connected to Arduino UNO using push buttons
Tutorial plan
1- Role of the push button in robotics
2-The components necessary to control the RGB LED module by push buttons through the Arduino UNO board
3-Mounting the Arduino UNO board with the RGB LED module and push buttons
4-Programming the Arduino UNO board to turn on the RGB LED module using the push buttons
Role of the push button in robotics
Push buttons can play a significant role in robotics by serving as a means of human interaction and control in various ways:
Start/Stop Control: Push buttons are often used to start and stop robotic systems. For example, a start button can initiate the robot's operation, and a stop button can halt it in case of an emergency or to end a task.
Emergency Stop (E-Stop): Emergency stop buttons are critical safety features in robotics. They provide an immediate and easily accessible way to shut down the robot in case of a malfunction or a hazardous situation. This is crucial for ensuring the safety of both the robot and the people working around it.
Mode Selection: In more complex robotic systems, push buttons can be used to select different operational modes, such as autonomous mode, manual control mode, or specific task modes. Users can switch between these modes using buttons.
User Interface: Push buttons can be used to provide a simple user interface for users to interact with the robot. They can trigger specific actions or functions, like moving an arm, activating a gripper, or changing the robot's behavior.
Teaching and Programming: Push buttons can be used in a teaching or programming mode, where operators can manually move robot arms or other components to demonstrate desired motions or trajectories. This information can be recorded and later reproduced by the robot.
Limit or Home Switches: Push buttons can be used as limit switches or home switches in robotics. They help the robot establish reference points or boundaries for its movement, ensuring accuracy and safety.
Calibration and Configuration: Push buttons can be used for calibrating sensors, configuring parameters, or setting up the robot's initial conditions. They can be part of a setup process to ensure that the robot operates as intended.
Reset or Clear Function: Push buttons can be used to reset the robot's state, clear error conditions, or restart specific tasks. They can help recover from unexpected situations.
User Feedback: Some push buttons may include indicator lights or displays to provide feedback to the user, such as the current mode, status, or system health.
Push buttons, when combined with microcontrollers and control systems, offer a convenient way for humans to interact with and control robots, whether in industrial automation, research, or various other applications. Their design and functionality can vary based on the specific needs of the robotic system and the safety requirements associated with it.
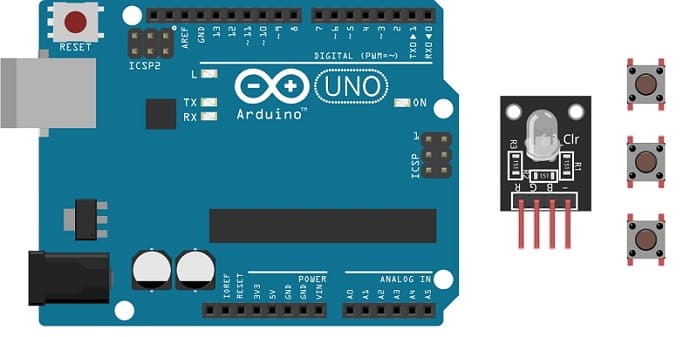
The components necessary to control the RGB LED module by push buttons through the Arduino UNO board
To control the module LED RGB using an Arduino UNO and push buttons, you will need the following components:
Arduino UNO:

The Arduino UNO is a microcontroller board that serves as the brain of your project. It provides the necessary I/O pins and processing power to control the RGB LED module.
RGB LED Module:
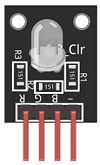
This module contains a red, green, and blue LED, allowing you to produce various colors by controlling the intensity of each color component.
Push button:
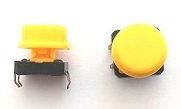
A push button, also known as a momentary switch or tactile switch, is a simple yet commonly used electromechanical component in electronics. It is designed to make or break an electrical connection temporarily when pressed or released.
Resistance
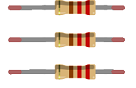
In the context of electronics and electrical circuits, a resistance refers to a passive two-terminal electrical component that restricts the flow of electric current. It is typically measured in ohms (Ω).
Breadboard:

A breadboard is a prototyping board that allows you to build circuits without soldering. It provides a convenient way to connect the components together.
Jumper Wires:

You'll need jumper wires to make connections between the Arduino UNO, RGB LED module and breadboard.
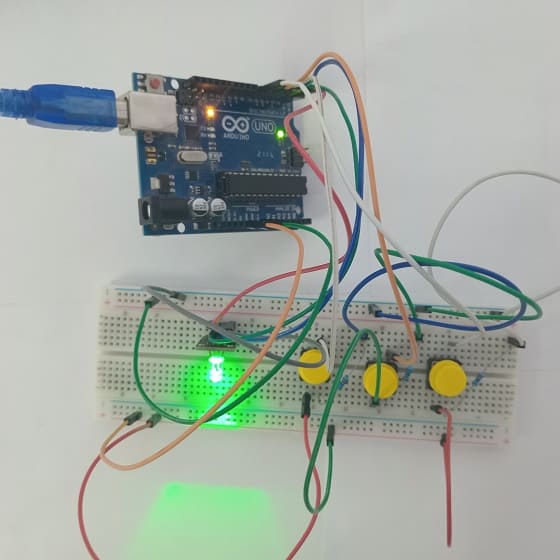
Mounting the Arduino UNO board with the RGB LED module and push buttons
Once you have the necessary components, you can proceed with the following steps to control the RGB LED module:
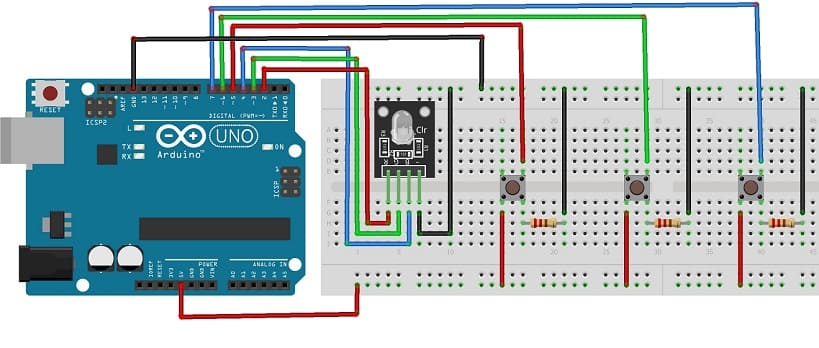
1- Connect pin R (red) of RGB LED module to pin N°2 of the Arduino UNO
2- Connect pin G (green) of RGB LED module to pin N°3 of the Arduino UNO
3- Connect pin B (blue) of RGB LED module to pin N°4 of the Arduino UNO
4- Connect pin GND of RGB LED module to pin GND of the Arduino UNO
For push buttons
1- Push button 1:
- Connect one leg of the push button to pin 5 of the Arduino.
- Connect another leg of the push button to the 5V pin of the Arduino.
- Place a 10k Ohm resistor between the third leg of the push button and the GND pin of the Arduino.
2- Push button 2:
- Connect one leg of the push button to pin 6 of the Arduino.
- Connect another leg of the push button to the 5V pin of the Arduino.
- Place a 10k Ohm resistor between the third leg of the push button and the GND pin of the Arduino.
3- Push button 3:
- Connect one leg of the push button to pin 7 of the Arduino.
- Connect another leg of the push button to the 5V pin of the Arduino.
- Place a 10k Ohm resistor between the third leg of the push button and the GND pin of the Arduino.
Programming the Arduino UNO board to turn on the RGB LED module using the push buttons
To program an Arduino UNO board to control an RGB LED module using push buttons, you'll need to write a sketch (Arduino program) that reads the state of the push buttons and adjusts the color displayed by the RGB LED based on button presses :
- A push button to turn the red color of the RGB LED on or off.
- The second button to turn the green color of the RGB LED on or off.
- The third button to turn on or off the blue color.
Here's an example Arduino sketch to control the RGB LED module with push buttons.
|
1 2 3 4 5 6 7 8 9 10 11 12 13 14 15 16 17 18 19 20 21 22 23 24 25 26 27 28 29 30 31 32 33 34 35 36 37 38 39 40 41 42 43 44 45 46 47 48 49 50 51 52 53 54 55 56 57 58 59 60 61 62 63 64 65 66 67 68 69 70 71 72 73 74 75 76 77 78 |
#define Red_PIN 2 // the number of pin R(red) of RGB LED #define Red_BUTTON_PIN 5 // the number of the pushbutton pin to light red color of LED RGB #define Green_PIN 3 // the number of pin G(green) of RGB LED #define Green_BUTTON_PIN 6 // the number of the pushbutton pin to light green color of LED RGB #define Blue_PIN 4 // the number of pin B(blue) of RGB LED #define Blue_BUTTON_PIN 7 // the number of the pushbutton pin to light blue color of LED RGB byte RedlastButtonState = LOW; // to keep the state of the first button and the red color of LED RGB byte RedledState = LOW; // to keep the state of the first button and the red color of LED RGB byte GreenlastButtonState = LOW; // to keep the state of the second button and the green color of LED RGB byte GreenledState = LOW; // to keep the state of the second button and the green color of LED RGB byte BluelastButtonState = LOW; // to keep the state of the third button and the blue color of LED RGB byte BlueledState = LOW; // to keep the state of the third button and the blue color of LED RGB unsigned long debounceDuration = 50; // millis unsigned long lastTimeRedButtonStateChanged = 0; unsigned long lastTimeGreenButtonStateChanged = 0; unsigned long lastTimeBlueButtonStateChanged = 0; void setup() { // initialize the red pin as an output: pinMode(Red_PIN, OUTPUT); // initialize the pushbutton pin as an input: pinMode(Red_BUTTON_PIN, INPUT); // initialize the green pin as an output: pinMode(Green_PIN, OUTPUT); // initialize the pushbutton pin as an input: pinMode(Green_BUTTON_PIN, INPUT); // initialize the blue pin as an output: pinMode(Blue_PIN, OUTPUT); // initialize the pushbutton pin as an input: pinMode(Blue_BUTTON_PIN, INPUT); } void loop() { // to turn the red color of the RGB LED module on or off using the first button if (millis() - lastTimeRedButtonStateChanged > debounceDuration) //start the button/LED functionality if enough time has passed since the last time the button’s state was changed { byte RedbuttonState = digitalRead(Red_BUTTON_PIN); // the pushbutton is pressed if (RedbuttonState != RedlastButtonState) { lastTimeRedButtonStateChanged = millis(); RedlastButtonState = RedbuttonState; if (RedbuttonState == LOW) { RedledState = (RedledState == HIGH) ? LOW: HIGH; // Toggle the state of the RGB LED when the button has been released digitalWrite(Red_PIN, RedledState); // turn the red color on or off depending on the state of the LED } } } // to turn the green color of the RGB LED module on or off using the second button if (millis() - lastTimeGreenButtonStateChanged > debounceDuration) { byte GreenbuttonState = digitalRead(Green_BUTTON_PIN); if (GreenbuttonState != GreenlastButtonState) { lastTimeGreenButtonStateChanged = millis(); GreenlastButtonState = GreenbuttonState; if (GreenbuttonState == LOW) { GreenledState = (GreenledState == HIGH) ? LOW: HIGH; digitalWrite(Green_PIN, GreenledState); } } } // to turn the blue color of the RGB LED module on or off using the third button if (millis() - lastTimeBlueButtonStateChanged > debounceDuration) { byte BluebuttonState = digitalRead(Blue_BUTTON_PIN); if (BluebuttonState != BluelastButtonState) { lastTimeBlueButtonStateChanged = millis(); BluelastButtonState = BluebuttonState; if (BluebuttonState == LOW) { BlueledState = (BlueledState == HIGH) ? LOW: HIGH; digitalWrite(Blue_PIN, BlueledState); } } } } |
27 comments

pepek gratis 22-06-2626
Sweet blog! I found it while surfing around on Yahoo News. Do you have any suggestions on how to get listed in Yahoo News? I've been trying for a while but I never seem to get there! Cheers
đọc xem sex mới nhất 22-06-2626
Simply desire to say your article is as amazing. The clarity in your post is simply nice and i could assume you're an expert on this subject. Well with your permission allow me to grab your RSS feed to keep up to date with forthcoming post. Thanks a million and please continue the gratifying work.
memek 22-06-2626
Hello, everything is going fine here and ofcourse every one is sharing facts, that's truly fine, keep up writing.
dewa89 dewa 89 dewa89 link dewa89 resmi 22-06-2626
Simply wish to say your article is as surprising. The clearness for your publish is simply spectacular and i could think you are a professional on this subject. Fine together with your permission allow me to snatch your feed to keep up to date with forthcoming post. Thank you 1,000,000 and please carry on the enjoyable work.
scam online 21-06-2626
continuously i used to read smaller articles that as well clear their motive, and that is also happening with this article which I am reading here.
xem ngay xem sex cực hay 21-06-2626
Great goods from you, man. I have understand your stuff previous to and you're just extremely great. I really like what you've acquired here, certainly like what you are saying and the way in which you say it. You make it entertaining and you still care for to keep it sensible. I can't wait to read much more from you. This is really a tremendous website.
slot 5k 21-06-2626
I really love your blog.. Great colors & theme. Did you develop this website yourself? Please reply back as I'm attempting to create my very own blog and want to know where you got this from or just what the theme is called. Many thanks!
roof repair 07-06-2626
I'm truly enjoying the design and layout of your site. It's a very easy on the eyes which makes it much more pleasant for me to come here and visit more often. Did you hire out a developer to create your theme? Outstanding work!
barudakwin 04-06-2626
I really like it whenever people come together and share ideas. Great site, stick with it!
online shop barudakwin 20-05-2626
If you are going for most excellent contents like myself, simply pay a quick visit this web site all the time as it offers quality contents, thanks
imker portal 18-05-2626
Hi, just wanted to mention, I loved this post. It was helpful. Keep on posting!
imkerei 16-05-2626
Hey there, I think your blog might be having browser compatibility issues. When I look at your blog in Chrome, it looks fine but when opening in Internet Explorer, it has some overlapping. I just wanted to give you a quick heads up! Other then that, amazing blog!
winamaxwinfr.com 29-04-2626
I like the helpful information you provide in your articles. I'll bookmark your blog and check again here frequently. I'm quite sure I'll learn many new stuff right here! Good luck for the next!
https://1winvipfr.com 29-04-2626
Heya i'm for the primary time here. I found this board and I in finding It truly helpful & it helped me out much. I hope to offer one thing back and help others like you helped me.
jouer Unibet France 28-04-2626
I'll immediately clutch your rss as I can't find your e-mail subscription link or newsletter service. Do you have any? Please permit me realize in order that I may subscribe. Thanks.
https://mystakewinfr.com 28-04-2626
Howdy! This post couldn't be written any better! Reading this post reminds me of my good old room mate! He always kept talking about this. I will forward this post to him. Pretty sure he will have a good read. Many thanks for sharing!
Mystake en ligne France 28-04-2626
Good article! We are linking to this great article on our website. Keep up the good writing.
https://bwinplayfr.com 28-04-2626
Hello there, I found your blog via Google while searching for a comparable subject, your web site came up, it appears to be like great. I've bookmarked it in my google bookmarks. Hi there, simply became alert to your weblog via Google, and found that it's really informative. I'm going to watch out for brussels. I will appreciate for those who continue this in future. A lot of people will probably be benefited out of your writing. Cheers!
www.gamdomvipfr.com 28-04-2626
These are genuinely impressive ideas in about blogging. You have touched some fastidious points here. Any way keep up wrinting.
https://unibetvipfr.com 28-04-2626
Howdy just wanted to give you a quick heads up. The words in your article seem to be running off the screen in Ie. I'm not sure if this is a formatting issue or something to do with internet browser compatibility but I figured I'd post to let you know. The style and design look great though! Hope you get the problem resolved soon. Kudos
https://gamdomvipfr.com 27-04-2626
I got this site from my pal who informed me on the topic of this site and now this time I am visiting this website and reading very informative articles or reviews here.
https://enjoygamefr.com 27-04-2626
Pretty! This was an incredibly wonderful article. Thanks for providing this info.
https://bwinplayfr.com 27-04-2626
I believe that is among the most significant info for me. And i'm glad studying your article. But should statement on few general issues, The site taste is perfect, the articles is really excellent : D. Excellent activity, cheers
https://1winvipfr.com 26-04-2626
It's hard to find educated people about this topic, however, you seem like you know what you're talking about! Thanks
https://enjoygamefr.com 25-04-2626
It's the best time to make some plans for the future and it's time to be happy. I've read this publish and if I could I wish to suggest you few attention-grabbing issues or tips. Perhaps you could write subsequent articles relating to this article. I want to read more issues approximately it!
https://winamaxwinfr.com 24-04-2626
Fantastic goods from you, man. I have take into account your stuff prior to and you are simply too great. I really like what you've obtained right here, certainly like what you are saying and the way wherein you are saying it. You're making it enjoyable and you continue to take care of to keep it sensible. I can't wait to learn much more from you. That is actually a great website.
trading platform 09-04-2626
Ⲩou actually make it seem really easy with your presentation but I to find this matter to be actually օne thing that I think I'ⅾ neᴠer understand. It kind օf feels too complicated and very extensive for me. I'm having a look ahead f᧐г your subsequent publish, I will try to get the dangle of it! my blog post ... trading platform
Leave a comment
Passion for robotics

Recent tutorials

Robotics workshop

Polpular tutorials


Making robots

Most commented tutorials


Robotic arm

Categories
Smart Home

Purpose of this website
Educational robotics refers to the use of robots and robotics technology to promote learning in educational settings. It involves the integration of technology, engineering, and computer science into the classroom, allowing students to engage in hands-on, project-based learning experiences.
In this context, our website represents an excellent resource for parents, teachers and children who wish to discover robotics.
Contact details
Zaouiet Kontech-Jemmel-Monastir-Tunisia
Popular articles
Pictures of the articles
Robotic site created by Mohamed Ali Haj Salah - Teacher info